Wednesday, 16 July 2014

Then and Now...

Hello Crafters...
It's shinning and raining in Bangalore and absolutely the right feel to get your creative juices flowing!!!
Well, today's post is yet again a picture heavy post...which of mine is NOT!!!! Sit back and relax...
How does it feel to create your own home decor projects and that too space saving cos you are not buying something new but altering things lying around at home! Well for this there a re quiet a few of them!!!
I keep telling my husband," I haved saved you a fortune by not buying deco items" and in reality he has no clue how much I spend on craft supplies, LOL!!!
There again, the real satisfaction is playing with trash, and here it is the burlap panel! I made my own burlap panel for this project using an empty cereal carton box and an old gunny sack from the attic!!!

This otherwise untouched, rejected gunny sack got loads of attention and pampering from me....treated it to a good scrub and wash and later rinsed it in fabric softener...oh my! smells and feels great!
Well, you wondering, if it's worth all the trouble??? have a look...

I stuffed the carton with old newspaper for making it sturdy and then wrapped the burlap piece and adhered it with strong glue and also screwed in some jump rings on the top to make it hang! PRICELESS...literally!!!
Burlap panels are a rage now...I love the grungy texture and immediately can think of only vintage but amazingly it fits into a contemporary set up to..
This is what I did to it...
The panel was gessoed randomly and I played around with stencils from Prima(clocks), leaf stencil (local craft store) and home made texture paste in peach and green! The tissue wrap with mucic notes and butterflies too is home made and have scrunched it up in various places.


The top cluster of hand made blooms in shades of peach, all using the TH tattered florals and some die cut foliage too.


The bohemian gypsy in me had a feast!!! Loved making these beaded charms and hung them in different levels from the sides. You can actually play around with them by positioning it wherever you want!!! Hope you can see the vintage clock hanging from the rose!


 The floral cluster and the hand made floral spray at the corner and spilling to the edges of the panel. The lace flower is hand made too and has a generous inking and misting of spiced marmalade and wild honey!


 The thought behind this panel was to create a "then" and "now" of me...The "then" is me at 4yrs plus and the "now" is 42+!!! Just like the seasoned, old burlap...LOL!!!
The black lace at the bottom is gessoed with my finger just to give it a softer look. The TH clock and the hands pointing are chipboard pieces, heat embossed in white. The heart behind the little "me" too is a chipboard piece with scrunched up tissue wrap. The pocket watch is a die cut with TH visual artistry stamp( my fav embellishment for vintage projects). I have entwined a piece of black bakers twine to the jute rope(for hanging) to balance the black lace at the bottom.
Well, with that we come to the end of the "BEFORE" and "AFTER" of the old burlap and the "THEN" and "NOW" of me!!!
For this project, my husband got a good deal...not only on the deco piece but also,he got a gorgeous model to pose for FREE!!!!
What say???? Do let me know what you think about this project...am waiting, I had a blast making this for "me" with a lot of my favourites...re cycling, texture, colors, hand made blooms, charms, laces and mostly my current passion for mixed media and vintage style!!
Next time you see a gunny sack/bag, DON'T ignore it...there's a whole big canvas, waiting to be altered !!!!
Thank you all for your patience!!!
Am linking this to...
Until then,
Happy Crafting and re cycling.
Hugs.

Friday, 11 July 2014

Fragile mail !!!

Hello Crafters…
Firstly, thank you so much for all the lovely comments that you left on my village in a bottle. I am back again today with another set of altered bottles….
The best thing about this project is, you first clean the bottle and then you mess and dirty the place to make it look old and aged again!!! I love the vintage and grungy look of Tims’s work and none of my projects are complete without a bit of tearing, distressing or using Distress inks!!!
What more, my bottles today are based on a postal theme and have used the stamp set from ITSY BITSY ”Vintage stamps”.

The bottles were first given a coat of gesso and then went on to work 2 different techniques.
Bottle 1:
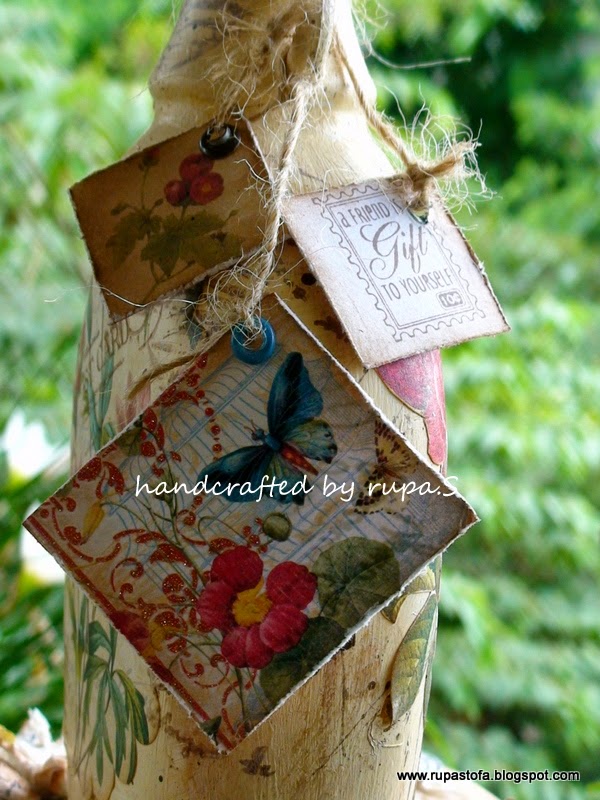
After the gesso, gave a coat of acrylic color in off white and then inked with DI, vintage photo on all the edges to give an aged look. Later mixed black and brown acrylic colors and did a generous color splat on the bottle. I fussy cut some floral print from DCWV French stack and using home made modge podge stuck it to the bottle. The cut out was inked with vintage photo too. 
I tore out the word “beauty” from the same stack and then using the postage stamp and scrip stamp from the set went about randomly stamping all over the bottle with vintage photo DI.The butterfly too is from the same stack.
I then cut out a few mini tags from the same stack, distressed the edges using TH distressing tool and stamped some friendship quotes on it and hung it around the bottle neck with natural twine.

Bottle 2:
This is vintage style too but after the gesso, I painted a lovely apple green acrylic color and then used the crackle medium to create cracks. When it was tacky, I applied the top coat of yellow ochre and voila! There appeared the lovely cracks…Oh! I so love this look and it looked even better when I inked the edges with vintage photo.

Here, I have used a lot of Prima stamps…the doll is paper pieced in vintage colors and pearls and colored using D inks too. Have used the vintage postage stamp in this bottle too and the blooms are all hand made and have the script stamping on it too. I have used TH tattered florals die to create all the flowers here, inked and misted them with picked raspberry and milled lavender and then inked the edges with vintage photo to give the dried up look!

The PP is from “something blue” stack from Prima and have fussy cut some roses here. The tag too has a Prima sentiment. The lace flower on the lid is hand made too and inked with picked raspberry and vintage photo. The pocket watch is using Joycrafts die and TH visual artistry stamp!
The stamping against the cracks on the bottle just gives a lovely worn out look and personally , I like the 2nd bottle better then the first!
How about you??? Thank you so much for stopping by and would love to hear your feedback.
Am linking this to…
A Vintage journey
Imaginations
(have used PP, die cuts, pearls and butterfly)
Until then,
Happy Crafting and recycling.
Hugs.


Monday, 7 July 2014

Bottled up !!!

Hello Crafters…
My love for altered projects is increasing by the day and looks like this month, my creative  mind is working on one after the other! Sure creative therapy for my soul! At this rate I wonder what I would do when have nothing to alter!
Today’s project is literally a scratch to start project…an altered bottle! So, what’s new here??? Well it’s an altered bottle, bottle cap and the cover of a card board box all put together to create this lovely house!!!!
Yes, you would have seen a bird house, tree house but have you ever seen a bottle house and that too with a tiny little garden….have a look.
I wanted to create something totally different on this bottle and that is when I decided to work around a greeting card that I had. It is a typical scene from the rural villages of India and I decided that would be the theme for my altered bottle. Here you go… a scene from the lovely Indian Village!
This project gave me the experience of being a creative artist, a


crafter, a mason, a gardener,  a landscaper and a hair stylist(It was not easy to weave the thatched roof and then trim the edges,  lol)…all in one go…BUT who is complaining???? “HOME IS WHERE THE HEART IS…”
Well, a tour around the house will show you everything…
A first coat of gesso and pva glue mixed and sponged on the bottle. Look at the fine texture it has created.
Home made texture paste with acrylic colors Indian read and burnt sienna thru the bricks stencil...mason at work!!!
The greeting card merges with back ground magically! The secret of homemade modge podge again!
The basic structure of the garden...made with the cover of a box, chipboard pieces strung together with twine and LOVE.
The landscapist and the gardener did a good job! An aerial view of the stand alone garden with the fence, creepers, hand made blooms and the cute l'le butterflies...
The house inside the garden...
The raw beauty of the exposed bricks and cement texture...
The front yard...full of colors, radiates a lot of warmth and very very inviting isn't it???
The back yard...the window is an IO die cut...
The thatched roof on the bottle cap all tied up with a jute rope...the house of those 2 lovely birds with the perfect sentiment (from Marriane designs)...what say???
A house like this is bound to be visited by birds and butterflies all thru the year...you are welcome too! That's the beauty of a typical rural, Indian home...full of LOVE and WARMTH...there is a place for everyone here!
Thank you so much for stopping by and taking time to leave your comments…it means a lot. How did you like the creative engineer in me…I always believe there is scope for improvement. Do let me know.
Until then,
Happy Crafting and recycling.
Hugs.


Friday, 4 July 2014

call me CRAZY ????

Hello Crafters...
Am here today with I think a bizarre project ! Call me crazy...but I just can't help working on altered projects. Every time I look around the house to see what all items are unused, old or need a makeover and I accumulate them and work on altering them!
So, This time in queue was this bathroom slipper,,,yes, you heard me right!!!

I had taken a couple of these from a hotel that we were staying during our vacation and I knew that someday it would come to use BUT never thought I would use it this way!!!!! These are unused of course ,LOL!!!!

I was so drawn to this challenge by Simon says and they wanted something in white! This slipper in it's original form was pure white and I thought I will work on vintage, shabby chic theme. I chose the color pink to go with it and have

 used different mediums of the color and different shades too (mailny spun sugar and picked raspberry DI in various dilutions).
Firstly, I stuck this lovely PP from DCWV French stack  and also adhered a thick piece of chipboard to the sole so that it is sturdy and does not sag with kind of work that I was planning!
 Created textures using home made texture paste in light pink and used Prime clocks stencil.

I had this lovely vintage quote on friendship which I thought would make a good focal point.

  All the flowers again are hand made using die cuts from TH, Joy crafts, punches and they too are in different shades of pink. They have all been misted and sprayed with inks and curled and twisted to become these beauties and also inked the edges with vintage photo.

The pocket watch too is a combination of a die and TH stamp and is totally Prima inspired embellishment in shabby pink!
The doily at the base gives a delicate, feminine look and is from CLD. The leaves are from spellbinders. I altered the clothes pin too and used it to clip a bunch of unused note book paper which has been distressed and inked too.
The challenge at ABAC required us to use "anything 5" and here I have used 5 flowers and also have stamped the 5 letter words which represents the spirit of today's woman!

I have lined the edges of the slipper with jute rope and have used the same to create a loop to hang it on the wall!

This definitely is finding a place near my telephone . Now, no more hunting for a paper or a pencil and I now have a place for my pending bills! The pocket is so handy to keep those little coins and changes that you need everyday!

Well, re using, altering, creating, hand made and utility...all in one go!!!
Do you still want to call me crazy??? My husband gave me a 9 on 10 for this and says this is my creative  best !!! Is he crazy too??? Am waiting to hear your feedback...Thanks soooo much for stopping by.
Have a great weekend.
Am linking this to...
http://www.simonsaysstampblog.com/mondaychallenge/?p=1696
http://anythingbutacard.blogspot.in/2014/06/heading-into-summer-with-another-fifth.html
http://lulupu.blogspot.in/2014/07/lulupu-challenge-34-bingo.html
(have used die cuts, stamping, mist/spray)
http://rheddscreativespirit.blogspot.in/2014/07/julys-challenge-guest-designer-call.html
Mixed media monthly challenge
Until then,
Happy Crafting and Re cycling.
hugs.

Thursday, 3 July 2014

On a roll...

Hello crafters...
Am back again with yet another trash to treasure. This is literally trash because it was a real challenge for me to work on this!
 I had given standing instructions to the warehouse keeper of an export office (next to my house) to keep me in mind whenever he is discarding junk like boxes and empty duct tape rolls. The man after a quizzical look happily agreed to do away with store house junk and in the process I had accumulated loads of empty tape rolls. He was taking me seriously now and one day he gave me THIS!

The re cycler in me could not say NO and the crafter in me was a bit confused as to what to do. It was lying in my store room for months, until I took out yesterday and said I have to do something to this poor baby who would otherwise end up in the trash can!!!! This is such a long and sturdy structure and believe me a real hard nut to crack it was!!!
But, I was not giving up and this is how it came to life!

The transformation that took place was destined I guess, because I had my dearest friend is mind when I created this. Her birthday is on the 7th and I wanted to give her something unique and handmade of course! She is an amazing lady with a big heart  and has a lovely home to showcase handmade creations (well she dosent have a choice, bcos its from me!!!)....
 I had pretty much decided that I wanted a shabby chic, vintage look with some textures on it...One thing led to another and this is the final outcome...the pictures will tell you that. It was a little difficult to get the pics from all angles...hope you like it.

The blank roll all patched op with scraps of PP from all brands like DCWV, Recollections and Prima and have done faux sticthing on the patches. It was the lightly water washed with gesso and then created textures with honey comb stencil and crackle stencil from Prima.


I had a calender given to me which had some lovely vintage flowers on it which I tore and made it into post card which are heavily inked with vintage photo and walnut stain to give an aged look and adhered it to the patched up roll.

 made some vintage friendship tags which I mounted on canvas pieces with brads and then  stuck it on the roll. The rest of it was easy...I loaded it with hand made blooms and also stamped a lot of butterflies on it.

For the top,I took out some white vintage lace and tea dyed it and also inked the edges with vintage photo and then stuck it around the rim. The happy bday banner sits proudly on the top!


the tags all mounted with loads of gardenias, roses and and some delicate flowers made with punches.

I do have a another roll with me and if any of you have other ideas as to what can be done, pl shoot! I would like to do something different with it. Thank you so much for stopping by and I love to read what to you have to say and learn from it.
I think this will make a lovely deco piece and light up any corner of her house, what say????

Am linking this to...
http://lulupu.blogspot.in/2014/07/lulupu-challenge-34-bingo.html
(have used the middle row, stamping, ribbons and punches)
http://alteredeclectics.blogspot.in/2014/07/new-month-and-so-another-challenge.html
http://rheddscreativespirit.blogspot.in/2014/07/julys-challenge-guest-designer-call.html
http://decoratetocelebrate.blogspot.in/2014/06/challenge-78-fourth-of-july-or-birthday.html
Until then,
Happy crafting and re cycling.
Hugs.

Wednesday, 2 July 2014

Sunny side up!!!!

Hello Crafters...
Today's project is  fun and kiddy ... in the sense all kids in general would LOVE to be here and grown up kids like us too!Had a small conversation with my 4.5yr old daughter...what do you see in the beach and she says, sand, water, waves, shells and insects!!!(she dint get the word crab!!!) and I ask her what do like about the beach and she rattles..." I love getting wet and messy in the sand and water"...How true...I had the same experience of getting messy with the sand and loved every bit of creating yet another TRASH TO TREASURE!!!

 So are you ready to take a stroll on my private beach ?? Here we go...

This lovely box measures 4" X 15", what a lovely canvas to work on!!! It was generously donated to me by a crafting friend who believed this trash had a future with me!!!
Since summer is all about the sun and the beach , i decided to alter this box to that theme and quite a few challenges who wanted this too.

 I just tore a piece of PP from the Prima Seashore collection and adhered it to left top corner  and for the remaining i just a sprinkled some beach sand over pva glue!
Applied home made texture paste with a Popsicle stick all over the sides and the base of the box and on the PP and then colored with LSG sprays.

 The lovely texture created with the inks felt like crackle effect and I tried to match the color of the sand. The box is basically in blues and browns.
Had a sun face image which I gesseod and inked .

For the embellishments, I stuck some shells and foliage and some handmade hibiscus flowers and also some tiny flowers in pastel blues. The hibiscus flowers adds a lot of color and warmth to the otherwise cold colors here!

I stamped the little girl(my daughter thinks it's her) and the sentiment using Miscia stamps and colored it with markers and added some pearly white dots to the girls dress! Am sure she will have a great time in the sand...

The front of the box has a few handmade flowers, shells and some crabs climbing uppppp!!!

I hand dyed the cheese cloth with broken china and vintage photo and made it into a ribbon and tied it around the middle of the box just to break the continuity of the browns!!! Hope you can see the cute little dolphins hanging from the bow and little pebble feet peeking beneath the box.

 The entire box has been misted with LSG cactus gold and its a shame the camera cannot capture the shimmer! As I am typing, I am just admiring the sparkling sands...
As you open up the box I have stamped beachy images and crab border on the PP and stuck on the top and inside of the box.


That's pretty much it...Hope you loved the stroll !! well I got really messy with this project and it gave me a high and I could relate to the innocent expression of my little one !
Thank you so much for stopping by and would love to hear from you. I feel really good saving another item from reaching the trash... LIFE IS BEAUTIFUL...isn't it ????

Am linking this to...
http://citycrafter.blogspot.in/2014/07/city-crafter-challenge-blog-week-218.html
http://avenue613.blogspot.in/2014/06/challenge-78-anything-goes.html
http://beyondgrey.blogspot.in/2014/07/bgc54-lets-get-kiddish.html
http://sentimentalsundays.blogspot.in/2014/06/challenge-213-summer.html
http://ourcreativecorner6.blogspot.in/2014/07/homemade-flowers-and-hand-dyed-ribbon.html
http://thatscraftychallenges.blogspot.in/2014/06/all-at-sea-challenge.html
http://theartisticstampercreativeteam.blogspot.in/2014/07/julys-challenge-by-seaside.html

Until then,
Happy Crafting and re cycling,
Hugs.