Friday, 19 September 2014

Buttons and Bows-DT Post for Scrapping4FunChallenge

Hello Crafters,
I have a special announcement to make today. I have been invited to be a member of the design team over at the fabulous challenge blog Scrapping4Fun.  I am  so honored to be asked and thrilled about the idea of crafting along side such a talented group of crafters!

If you would like to learn more about me and my team mates, you can find my introduction here.
 
And now, my very first challenge as a member is a take on this cute picture inspiration, BUTTONS AND BOWS.


As soon as I saw this pic, I could only say “cute”…the colors, the textures and the OOO so girlie image! What more, it was little girls birthday on the 15th and this was PERFECT timing to make something for her based on this challenge.

As always, I had to upcycle something and this time it was this old tin, a generous trash contribution from a friend. She knew I would put it best use and I hope I have done justice to her thoughts! Onto the making of this “Trash to Treasure”….

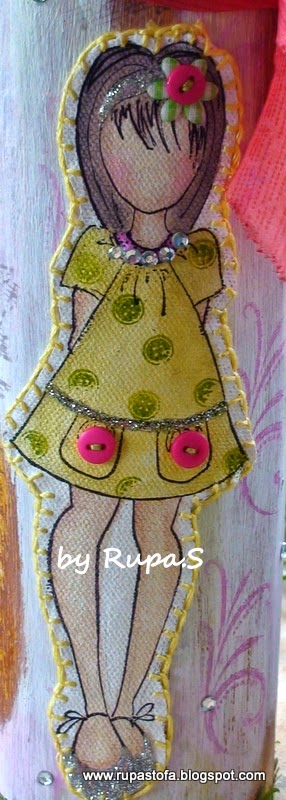
My 5 yr old loves the Prima doll stamp and thinks it is a replica of “her”! I wanted a more “durable” image and so I stamped on a piece of canvas and colored it with distress inks. I gave a dash of glitter and bling to the hair band and shoes and stitched some cute buttons to the pockets. Also stamped some buttons using the Bo Bunny stamps. All around the edges of the canvas I used the embroidery floss to give a “blanket stitch”, keeping in mind the colors from the inspiration. Felt accomplished as a sewer here!
For the tin, I firstly gessoed it and gave it a coat of yellow ocher and brown acrylic paint.
 I wanted a weather wood look, yes am loving anything “woody” these days! 
I have given the “Vaseline resist” technique to get that look. I applied Vaseline in spots and then applied a coat of white acrylic paint and waited for it to try. Obviously the Vaseline will resist the color and using a baby wipe I rub the areas where the Vaseline is applied and voila! The paint comes off and reveals wood beneath! My weathered wood tin is ready…

I then stamped some flourishes, butterflies and music notes randomly. Created some grassland using IO dies and gave the little girl her space! She fitted in beautifully in her new home!

I punched some holes on the rim and threaded a lovely chiffon fabric( remnants from an old dress) and made a lovely bow with button! OH ! so girlie…

 And when you turn around…this is what you see!


I took the actual image inspiration and made mini tags using cup cake stamps from Inkadinkado. My daughter loves the creamy cakes…so this was  a double treat for her! I colored them in her fav colors and also stamped some birthday messages and pictures of balloons and gifts at the back of the tag.

I joined then all with a button brad and some metal charms which is any little girls treasure…a comb, a pair of high heels and cute envelope with a flower!

That’s about it…This shabby, girlie project was a great deco piece for her birthday celebration with all her favorite colors and elements!!!

Hope you all liked it to. Do let me know and of course take the time and have fun playing along this challenge. It is irresistible…


Thank you so much for stopping by. I would like to share my “Doll” in these wonderful challenges too..
Loves To Scrap Challenge Blog- Anything Goes
Decorate To Celebrate- Anything Goes
Artistic Inspiration -Anything with Bling
Crafty Girls Challenge - Anything Goes
Loves To Scrap Challenge!- Anything Goes
Until then,
Happy Crafting and Re cycling.
Hugs.

Until then,
Happy Crafting and Re cycling.
Hugs.


Thursday, 18 September 2014

A friendly gesture and a WIN!

Hello Crafters,
Am here for a different reason. I am so touched and overwhelmed by the response to " My Creaking Door". It probably craked the loudest here...

I am so happy to pin this up!
Not just this honor, but my bloggy pal Sonia wanted me to be a guest in her blog with a tutorial on how I made the "faux wood log"! That was an icing on the cake and I jumped at this opportunity...
So, if you want to know how to create the wood log from a piece of cardboard do hop on here
http://cardsandschoolprojects.blogspot.in/2014/09/woodgrain-tutorial-by-rupa.html
 and let me know if you have any more queries.

Thank you once again for all your support and comments...makes me want to do more. Will get back to you with another crafty creation....soon.
Until then,
Happy Crafting and Re cycling.


Wednesday, 17 September 2014

The Mobile Nest...

Hello Crafters,
A warm welcome to all of you. Today I have something bright and vintage with a twist! Does it make sense…it will soon!
 My experiments with “Trash” continues and looks like “re cycling” bug will NOT leave me! Every time I hear that word in any challenge, heart sings and my fingers dance!
So this is want went under the scanner this time…an empty room freshener refill carton and a liquor carton!

And when they got together, this is what happened…

The restless souls will have to wait till the end to see the “twist”.
I went about sticking the refill carton to the flattened out liquor carton and gave a generous coating of gesso. I am re discovering my love for acrylics and always looking out to try new techniques.
My love for nature naturally favored the greens, yellows and browns and using these paints, I created a blended background. I also edged the ends with Distress inks peeled paint and walnut stain. I love to bring about that vintage feel to any project, maybe it’s my age..LOL!!!

Stamping on tissue is a new chapter for me and sounded interesting. I decided to go for it and stamped some birds, nest and music  notes using Prima stamps, “Nature walk” on tissue. I used archival inks in green and brown and tore them to be adhered on to the colored bg.
I used matt gel medium and just loved the way the tissue held on to the bg colors leaving an impression of bold stamping! I felt accomplished having tried something new, though on a small scale…still needs improvement.
I took the tissue stamping all around on the sides too.

For the main panel, I did dry embossing on brown card stock using the wood grain embossing folder and inked it with vintage photo and walnut stain.
The sentiment is from the net and I hand wrote it. It give s such a warm feeling to the project and once you see the twist in the end, you will understand that makes a lot of sense “literally” too!
A prima bulb junkyard finding adds more warmth on the main panel.
A single flower using TH tattered florals…totally vintage with script stamping, jute center and natural twine bow! Love it..

To the base, I adhered coconut coir to give the feel of a 3D nest and added some “pearly” eggs! Beneath the nest there is some green foliage too.

To the back of the panel, I have attached a piece of burlap( torn and treated from a old gunny sack)! Yes, you heard me right, gunny sack…
Two eyelets on the top and paper rope stained with mustard seed and scattered straw ensures that nest can be hung from anywhere!
So, finally what do you think this will house??? Are you ready for the twist…here it is…

Now, read the sentiment once more..isn't it just apt??? LOL…
Thank you people for stopping by and do let me know what you think.
Happy to have salvaged quite a lot of ‘trash” here, my soul is happy with this song and dance!
I would like to link this nest to..
Try it on Tuesday _ Re Cycling
Craft Stamper Magazine – Stamping on tissue
Sugar Creek Hollow – Word play
Crafts 4 Eternity _ Favorite color combo
Creatalicious Challenge – Flower Power
Crafting For All seasons _ Colors of Autumn

Until then,
Happy Crafting and Re cycling.
Hugs.

I


Wednesday, 10 September 2014

My Garden of Memories

Hello Crafters…
A warm welcome to all of you who have joined me recently and crafty hugs to my “oldies”. Thank you so much for the over whelming response to “My Creaking Door”..it’s seems to have creaked a lot and upon requests from my crafty friends I will soon have a pictorial up on how I made the wood grain log.
Today’s project is no exception…again an OTP altered project! Sometimes I wonder why my hands refuse to do simple things. The reason for doing this project is my 5 yr old daughter who is always full of questions and lately she has been asking us about our grandparents and their parents and their names and where they are and so on…the list goes on!
I dint want to do a typical family tree and decided to alter this…

One thing led to another and finally I ended up doing this and without further ado, here is my “ Garden of memories
A beautiful vintage garden sitting on my “popular” wooden plank with flags fluttering about “family ties” !!! This just took me back in time and I so so enjoyed every bit of this mega altered project!
A small surprise awaits when you open up the ornate framed door! The main tin has 2 washi tapes wound up, the measuring tape and the vintage keys. The door has an ornate chip board flourish frame from Creative Embellishments ( my prize win at Lessology) which has been heat embossed in gold. The door is secured on one side with TH hardware findings hinge and tied on the other side with hand dyed seam binding with an antique clock hanging too. There is a ring of bling that goes around the tin.
When the door is opened….
Voila! A mini treasure awaits! Yes…generations of memories all held together in a “circle of Love”. A circular accordion mini in earthy vintage colors to be preserved “forever”…it is going to hold pictures of our grandparents and fore fathers  with spaces for journaling and there are inserts too where I can write their names and the years they belonged to!
 To make the accordion I cut out circles from Prima, “sunrise sunset” paper pack and for another set to do the journaling I did “faux leather” technique an a lovely hand made paper in different colors! It actually ended up feeling like fabric…I wish you could touch it!

I used the Inkadinkado stamps and Distress inks in co ordinate colors to stamp on the pages. I have linked the accordion using fiber paper. In all there are 16 slots for pictures and journaling. I have kept the embellishments minimum inside the mini as I wanted the pictures to be the focus.
However, there are some vintage clocks and flowers that add some color and I have used up all the stamps from Fiskars memory set as inserts on each page. I have not added the photos now, I am working on getting a good print of the vintage photos, but before that I wanted to share this “treasure” with you all.
The lid of the tin is now a stand on which the album stands. It can be removed off its feet so that the album can be handled easily! The stand too is decorated with hand made flowers using Joy crafts die and the 3rd washi tape in yellow adds to the bright rim of the stand along with the bling!
The wooden plank garden, the stand, the frame, the album and the inserts can all be removed and placed back in their places easily!

I have torn the edges of the inserts and the flags and inked with walnut stain for the old, weathered look…the paper looks I said feels like fabric and you can actually see the ends fraying and it makes the vintage look so realistic. 
The flag poles too have been covered with washi tape. I have added the pebbles to give a garden feel and this doubles up as good deco piece too!
With this, I hope to answer my daughter’s questions and hopefully she will be able to answer her children’s questions too, Lol! 
I am glad I could do something to preserve a “ generation of memories”. Do let me know what you think of my “Garden of memories”..as always I am touched by all those of you who visit me and take that extra time to write something memorable!
Thank you so much for stopping by.
Am linking my “Circle of Love” to..
Lulupu _ use 3 washi tapes and a ready embellishment
Sentimental Sundays _ A touch of Vintage
Artistic Inspiration _ Round and round
Craft for the Craic _ something with circles

Until then,
Happy Crafting and re cycling.

Big crafty hugs.

Sunday, 7 September 2014

The Creaking Door !

Hello Crafters…
How have you all been doing? It’s September already and all I can think of is my daughter’s birthday. She will be turning 5 and thinks the month September belongs to her! Every day she goes about, “ so it’s September now, when is my birthday? “ That’s an everyday conversation now…but why am I saying this to you??? Cos she just got a new pair of shoes and while she is happy her pair, I am HAPPY with the empty box!


It went straight to my craft table and this is what it became after a few hours!!!


 Fall/Autumn/Flowers is the challenge in many blogs and how I love working on nature inspired challenges. 
Thanks you for the lovely response to my “Speaking wall” and this time it’s the “Creaking door” for you… earlier I also had "A Glowingwindow" which won in a few challenges! I think I can build a house now, Lol!
I had the dark woods and some bright colors in mind while starting this project so I made the lid of the box into wooden log door!
The planks on the door are hand painted with acrylic colors and bid flat brush! The dry brush technique here gave a wonderful texture here and the knots on the log too are done with the tip of the brush. Wish you could see and touch the texture here. I was reminded of my “One stroke painting” days as I enjoyed making this door and some planks to go inside the box too…
Gave a lot of ornate touches to the door with a couple of corner plates colored with gold alcohol inks and the hinges are heat embossed in gold and specks of black too using TH, hardware findings die.

The wooden door knob is again painted in black and then rubbed in the inks gold to give the metallic look and added a couple of charms to a chain link and left it hanging there!


The focal point here is the center wood panel which is distressed using the “Vaseline resist” technique. I have kept it simple because there was a lot happening around it. I snipped a few curls from an otherwise big flourish which I have heat embossed and topped with glossy accents to make it look like metal.
I then hand wrote the sentiment on a piece of tracing paper with the versa mark pen and heat embossed in gold and stuck it on the panel.
Now comes the colorful part…The flowers are all handmade  and inked with D Inks using Cheery Lynn dies except for the buds which is TH tattered florals. The leaves too are mostly CL and this set is my new purchase and love those tropical leaves set ( B 119)! I had a mixed color of leaves to go with the Fall theme and stuck to yellows, pinks and purples for the flowers too!

These colors against the wooden back drop was  so visually appealing and I just couldn't stop myself from going over board! Well, I really don’t need a reason to overload my projects and this is no exception. 
A few curly, twirly sprigs, sun flowers(DL 121), daisies(B310) and looooots of leaves add such warmth to the front door! I think this will make a good deco piece on the front door itself…may be will make one for that too!
And when the door creaks open… this is what you see!


Some wooden planks made with waste card board makes the shelves and stores my new collection of alcohol inks, embossing powders and there is room for MORE!!!
The sides  of the box are spray painted in black and gold where as the inside is given the same wooden log treatment. I have done some subtle stamping of flourishes using the Hero Arts stamp and Stayz On brown ink.
That’s it…did you hear the door creaking? Just let me know what you think of it. It’s always so encouraging to read all your comments and gives me a reason to visit you too!
Am linking this to….
Craft Hoarders Anonymous – All the pretty flowers
Our Creative Corner – Autumn image inspiration
A Vintage Journey –  with a flourish
Cheery Lynn Designs – All aboutTexture (have used sunflower, shasta diasy, tropical leaves, olive branches die)
The Mirror Crack' d – Anything goes

Thank you so much for stopping by.
Until Then,
Happy Crafting and Re cycling.
Cheers.


Monday, 1 September 2014

My Speaking Wall...

Hello Crafters…
New month welcomes us and am happy to welcome my old and new crafty friends and thank you too for stopping by.


Last stages of summer in many places and before it fades away, I have this project to share with you. My childhood memories about “summer” is about vacationing at my aunt’s place. We are more than dozen kids(cousins) who would meet up annually and play like crazy! My aunt’s backyard had lots of flowering plants and fruits too. The main being guava and gooseberry. Climbing these tress was the favorite pastime and except for lunch and dinner, we literally would live on top of the trees!
In memory of those good times spent…I made this “speaking wall” project. Have been working with cubes and cuboids lately…and this one too is another experiment with an empty liquor carton! I am actually discovering spaces from different sides of the box now…you will see soon!

I took my entire paper scraps and went about sticking pieces of it to the box and my! a whole of my scrap got over! Then after gessoing it, I made the home made texture paste in brick color and went about constructing wall, brick to brick using TCW stencil. I also gave some cemented texture in places. Once the texture dried, I applied fired brick, peeled paint, walnut stain and black soot to the bricks randomly  and my weathered brick wall was ready to speak!


Yes! My wall speaks from all sides and 360 degrees…have a look!
Front panel: I fussy cut images of fruits from the DCWV Botanical stack , adhered it to another plain PP which has the scripted bg and then inked the edges with walnut stain to age it up . I took relevant chit chat stickers and stuck it to each tile. The tile is sandwiched between acetate sheets. I gathered some rounded twigs from the garden and have done the faux bamboo framing!!!

Before adhering the frame to the wall, I have layered come coconut coir behind each tile, to give some natural feel. I have been saving so much and these came in handy for this project, you can also make lovely bird’s nest with it!
Back panel: I took out a lengthy floral image from the same stack and did the faux framing again…only this time, I adhered it with dimensional foam tapes so that there is a box created to hold some tags and loose paper. Some TH chit chat stickers speak here too.


Side panels: I have stamped these lovely quotes from Stampendous and distressed the edges and faux framed them too!


And now for the…
Top panel…The twist to the wall comes with the top panel here, where I have created 3 slots  and inserted empty tissue rolls and voila! A lovely country wall pen holder is ready!

Well it can hold just about anything on your table. I have laid a bed of coconut coir and some ready foliage and stuck some little blooms using TH tattered florals. Do you also see some oranges on top there?
Yummy, isn’t it…
Bottom panel: Has painted bottle caps on which the wall proudly stands on!!!
That’s pretty much what my walls have to say! You must have heard the famous saying “Walls have ears” but my garden wall here, has lots to say! Did you like it??? Well, my husband wants one for his desk without the roof garden!


This is going out to a crafty friend of mine, who had her birthday last week. I am hoping she will enjoy having this on her craft table and cherish my childhood memory!

Am linking this to…
Frilly and Funkie – Summer garden
Anything But A Card _my five F’s here- flowers, fruits, foliage, frame and feet!
The Mixed Media Monthly Challenge _ Almost all the colors from your palette except pink!
Artistic Inspiration - Anything goes/Memories
Make My Monday _ Indian Summer
Craft My Life - Anything goes
Rhedd's Creative Spirit - Anything goes
Altered Eclectics - Anything goes
We Love Vintage Challenge Blog - say it with flowers


Until then,
Happy crafting and Re cycling.
Hugs.