Wednesday, 21 October 2015

Roses on my cabinet

Hello crafty friends..
Welcome to my page today. Its festivities in this part of the world...as people are busy cleaning up their homes and get it ready for the coming festival season, I decided to give the OLD a NEW look!
Here is what entered my studio a couple of days back and I had a blast work with the Deco Art Chalky finish paints. 
Its a dream come true, I have always wanted to give my furniture a different look but not a NEW look, does that make sense??? I love it aged and distressed and YES, that look is possible in just a few steps with these paints!
Here is the process...
Step1- I removed the glass and the hardware items from the cabinet and gave it a good scrub and wash to remove all the dust and grime. Gave a coat of Americana decor “vintage”, waited for it to dry...just a few hours. 
I know what you are thinking...patience and me...yes I had to cos my reputation was at stake. This is house furniture and I will not get a second chance if doesn’t turn out well, lol!
A second coat too and this time I was smarter, I decided to work on the table top.
Step2- I had chosen this lovely decoupage paper from Deco Art Victorian Romance collection and since I had only one sheet, I decided to give it a background. 
I took a simple brown wrapping paper and stamped music notes with Archival black ink and edged the entire sheet with potting soil Archival ink. I then stuck the rose sheet in the center with decoupage glue and it was ready to hit the table. This was a tough part as it was BIG, I had to do it in sections to avoid creases. Once this was sealed, I gave it a coat of triple thick brush on glaze.
Step3- My second coat was way ready and now I distressed just here and there with sand paper...not too much this time! I wanted to bring those roses to the doors too and thought about stenciling. Luckily, I had a rose stencil and I worked my way all-around the front with chalky paints and some fluid acrylics from deco Art. 
I have to admit I had no patience to measure and stencil...all of this was done just by eye balling!
 I have use two tone colors too here and the flourish is a Sizzix die cut negative! For the sides I used the Americana Victorian baroque.
Step 4- Time for waxing! First came a coat of clear wax and this time too I dint waste the drying time. I cleaned up the glass and gave the handles too a coat of sponging and coloring. Once the clear wax was dry, I took a soft cloth and started rubbing the dark wax. I love how instantly the piece begins to age. Here is the difference...the left is with dark wax.
 That’s how much it ages...isn’t that beautiful???
Step5- a single coat of color inside the shelves and a coat of varnish and my piece was done. However, since this was going to be used quite often, I gave a second coat of varnish too. 
 Fixed the glass and the handle and Voila!my first big piece of hand painted, distressed, weathered and stenciled furniture was ready! A happy moment...I knew I am not going to stop at this....
Step6- Time to drag the piece inside from my studio...but I decided to give it a sun bath for an hour outside! This way, it cures a bit and there is no odor too.A little sunshine is always good.
Now, this is how it sits pretty in the dining room! 
The brick wall lends it a very country look and I have to admit, I did get a pat on the back from hubby!
 Yeah...that means it’s time to drag the next piece to my studio....
Thank you so much for stopping by today. Do let me know how you liked it.
Deco Art Products used-
America Decor chalky finish paints- Timeless and Vintage
Deco Art decoupage glue
Decoupage paper Victorian romance
Deco art stencil Victorian baroque
Deco Art Triple Thick brush on glaze
Americana decor creme wax clear and dark
Deco art media Ultra matte varnish


Until my next creative journey,
Happy crafting and recycling.
Cheers.


Thursday, 15 October 2015

ART THERAPY

Hello Crafty Friends...
Welcome to my page today...Happy to share this project with you today, which to me was so therapeutic and so the name!

A well spent creative time is therapy to the soul and this one is like that. I managed to make fabric paper or paper fabric...you could call it any way with just a piece of CONSTRUCTION PAPER and some kids crayons.

I know this is unbelievable but YES...it is as easy as that! Head over to lengthy tutorial at Rhedd's Creative creative spirit for the same.
Here are a few pictures ...

I so love the colors...I know a bright color palette from my side. I had a great time with stencils, crayons, paints, stamping and yes found my lost passion for machine stitching and hand stitching too!


There a lot happening in this project and I hope you get the time to read the tutorial and indulge in some therapy as well!I urge you to try the same.

If you do make one, do share it.
Deco Art Product Used-
Americana decoupage for Fabric
I would like to enter my journal book in the following challenges...
Beyond Grey Challenges- AG
STAMPlorations challenge Blog-Mixed Media
Loves to crate Ch Blog- Anything Creative mixed media
Sweet Stampin Ch blog-Script or text
All Sorts Ch Blog-No design paper
Craft Stamper magazine Ch blog- try a technique-Ink,stitch,paint,stitch
Polkadoodles Ch blog-Use a die cut
MOOMANIA-show patterns
Stamps and stencils - make it 3D
Until my next Creative journey,
happy Crafting and recycling.
Cheers.

Thursday, 1 October 2015

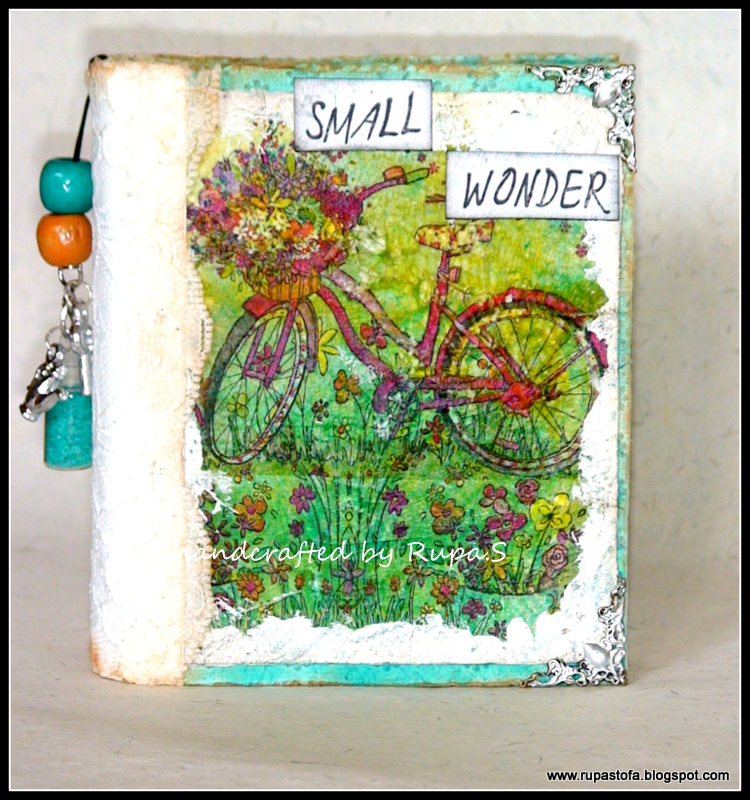
Small Wonder

Hello crafty friends..
Welcome to another month and I am back with my altered art project for Rhedd’s Creative Spirit. You can make anything but a card but altered art or mixed media only.
I have today a shabby book to share with you! It’s the size of a palm and unravels a big SURRISE in the end!
The book cover is a shabby chic style...after a long time from my side. For the cover, I dry embossed a white CS and then used DI peacock feathers to color it. Then took another scrap PP from Prime Sunrise Sunset pack and created texture with crackle texture paste. Once dry, I sprayed in some green and blue inks randomly.
I then decoupaged this lovely napkin onto this paper and then dabbed on some gesso on the sides.
The spine is using Tyvek paper and then I covered it with this pretty lace, (my prize win at Lessology). I inked the edges of the lace with tea dye DI and pierced an eyelet to hang this cute bottle charm. 
I have filled it with colored white sand. I colored white sand with peacock feathers DI. Love that color and some wooden beads and some silver charms give it thet perfect girlie look! The ornate metal corner is colored with silver alcohol inks too. I named the book “Small wonder”.
Ready for the ride ahead????
I shall now open the book and you can see the first SURPRISE...well, its not a book here!
 I altered a tin box to look like a book! On the lid i have a frame where I have used resist technique to color. I heat embossed a pattern with clear embossing powder and then mopped up the colors mustard seed, crushed olive and peacock feathers from the craft mat!
Well that not it...There is another SURPRISE inside this book.
Out comes a mini book...no ordinary book. Its a mini star book. It says “Short Stories” cos i have used the pages inside to showcase my daughter’s childhood photographs and against each picture I have these one line quotes from Inkadinkado.
There are 3 layers to this star book and on the final later I have used PP from Prima sunrise sunset stack and have done some stamping around the pages.
The colors in pink and yellow urged me to use up some more lace for the base of the page! It surely looks pretty with all that dressing, lol!
 Once the pictures and the quotes came in, it becomes an attractive display.
The advantage of a start book is that it can be a display on table or can be closed into a book at any time!
My daughter loved seeing herself in my craft project today! I hope you enjoyed too and play along with our challenge. Do drop in to see what the team has to show you.
Thank you so much for stopping by.
 I would like to have my “small wonder” enter the following challenges.
The Crazy Challenge- Shabby chic
Dream valley Challenge- recipe-Lace, pink, embossing
That Craft Place- Ag mixed media
Loves to Create Challenge- Ag mixed media
Lessology- Its reading time ( up cycled tin box)
Until my next creative Journey,
Happy crafting and re cycling.

Cheers.


Saturday, 26 September 2015

Ageing Gracefully !

Hello crafty friends..
Welcome today to my page. I have a REAL project to share today.
If you are thinking I am going to share some beauty tips, lol...No way!
As I told you in my previous post about being a member of the Deco Art Blogger Outreach program and receiving those dream goodies and actually using them on my old furniture’s at home...ITS A DREAM COME TRUE!
Yes, I finally laid my hands on my Kitchen buddy for 10 years which I thought should get a makeover.
This is how the old one looked...
And hers’ how she has aged gracefully, lol! Perfect isn’t it???
Just a few steps and you can get this look.
Step1- I removed all the hardware from the set and voila ready to give the first coat of paint. Yes, its that easy. No priming or sanding...just a clean surface and you are ready to go.
 I used different colors of Chalky finish paints for the trio. Before the first coat, I just rubbed some candle wax on the areas I wanted some distressing and then gave the first coat. Once dry, the second coat. For impatient soul like me, this actually dries VERY fast!
Step2- I love this..DISTRESSING! I had a blast working my Ideology sanding block and scraping paints off from areas. You can actually get carried away here...as to how much you want to distress.
 But I told you I love it...so some extra scrubbing to reveal the wood beneath and this is so easy bcos of the wax.
Step3- A coat of the clear wax. I gave a generous coat of the clear creamy wax and yes, waited patiently for it to dry. No risk here. Once dry I dint think twice to coat it with the dark wax. 
I love weathered and aged stuff and its just magic how instantly on applying this it just changes color! But, you need to apply and wipe off the dark wax before it dries. It’s amazing how it just settles down in the grains of the wood and lends that beauty to the ageing process!

Step4- I was not keeping them plain. I decided to do some decoupage on this with some vintage flower napkins. I tore out portions of flowers and adhered them with the matt gel medium and one dry have a generous coat of the ultra matt varnish too. For the tray, I did some stamping of butterflies and script..its a habit now, lol!
 But I liked the final look! Time to fix the hardware’s back.
That’s how EASY it is!
What was 10 years old has aged beyond so gracefully and beautifully! I hope I made the trio happy. But, I am happy how it looks in my kitchen now. PERFECT...all set to be noticed and complimented.
I already have my eyes and hands set on the next piece of furniture !
Waiting for your comments too.
Deco arts products used..
Americana Decor Chalky Finish- Timeless, Vintage, refreshing, lace (love the names)
Americana decor cream wax- clear and dark brown
Deco Art media matt medium
Americana Decor Ultra matte varnish
Have a great day.
Until my next creative journey,
Happy Crafting and recycling.

Cheers.

Tuesday, 22 September 2015

One for the table!

Hello crafty friends..
I have a crafty share and some good news too! As always I have an altered art project to show you and the good news is that I am a member of Deco Art Blogger Outreach Program! Yeah...I was more than happy to receive a bunch of dream goodies, mostly paints, varnishes, wax and so on for furniture distressing!
Do you know what that means...my fav old furniture’s will be getting a makeover soon...not going to spare them too, lol!
Here is what I created with a few of the new products that Igot from Deco Art. 
An antique wooden caddy...you think so??? Wait till the end for a surprise reveal!
Here is how I went about making it...
Step1- I painted the box with black gesso and went about creating textures with stencils, stamps and home made texture paste. I used some die cuts from my stash too. 
I have adhered a cute angel made with POP and resin mold and have worked texture around it too. The focal point on both sides is the heart shaped frame which too has a textured border. The rope running all along the base of the box is made with air dry clay.
Step2- Once the texture was ready, I painted the whole box with black acrylic paint and then started working some brushed pewter DS on it, followed by a wash of burnt umber fluid acrylics. 
To further antique the look, I gave the entire box a wash of antiquing cream in patina green and then rubbed with a baby wipe. Lastly I rubbed in old gold, Inka Gold too. My antique caddy was looking a museum piece now! As if that was not enough, I rubbed in rusty hinge DI in places to give a worn rusty look!
Step3- I cut out this lovely angel from a decoupage tissue and adhered it to linen white CS, and cut it to size to fit the heart frame. I aged her too with some distress inking and Inka gold.I have applied Liquid glass clear on heart and on the other I used Triple Thick diamond glaze! The little angle is secure now!
Step4- I decided to give a pop of color to the antique caddy by embellishing it in fall colors. I punched holes on both sides, used gold eyelets and strung a copper wire for handle. 
All the glass beads and baubles are from my stash and I have used some patina green, orange, copper and black colors which brightens the caddy! A little metal charm that says it all hangs from the handle!
Step5- On one side of the heart I have orange twisted rose buds and a rusty metal wing that hangs above the angel.
 
On the other side some pretty white flowers and have colored the flowers on the angel’s hair!
Finally, a coat of Ultra matte varnish and my caddy was ready. Here is how it looks on my table with a little natural freshness picked from the garden! 
I have kept a few of the supplies that I reach out too quite often, so that I get to see this beauty.
Did I tell you that I altered a wooden caddy??? How could I if I dint have one...
No sweats..but I have THIS!
Thank you so much for stopping by today. I love to hear from you.
Deco arts Products used
Burnt Umber Fluid acrylics
Antiquing Cream patina green
Liquid Glass Clear
Triple thick Diamond glaze
Ultra matte Varnish
I would like to have this caddy enter the following challenges...
Frilly and Funkie- Stamps be gone
TIOT- add some metal
Brown Sugar Challenge- Anything But A card
Crafting musketeers- Autumnal colors
Stamps and Stencils- Up, Up, away in autumnal colors
OLLCB- feminine
Loves to Create Ch Blog- Ag mixed media

Until my next creative journey,
Happy Crafting and Re cycling.
Cheers.


Thursday, 17 September 2015

Cuppa LOVE

Hello crafty friends..
A quick post to share with you today! I was experimenting to alter an empty liquor carton, I cut it right in the center to get 2 pieces and this is what I did it to it.
A tea bag dispenser! I have a detailed tutorial here where I did a shabby chic style. For the other one, I decided to make it Vintage and used my new Graphic 45 French Country Stack papers! I love the country style patterns in lovely fall colors and it has a vintage feel to it.
Since I was doing 2 dispensers from one empty carton, I decided to keep this one simple. The papers speak for themselves! I inked them all with Walnut stain DI.
I chose 2 coordinating papers from the stack to cover the outside and for the inside used a green PP from DCWV.

The base and the lid was made using heavy chipboard and adhered some bottle caps here as feet. I have colored them with red acrylic colors and inked the edges with Archival black ink.
Around the base is a lovely grass hedge. I have used IO dies for this. This gives a closed garden feel!
I have embellished the lid again in fall colors. I decided to pick the sun flowers from the PP and made them using CLD sunflower die. The l;eaves are using CLD tropical leaves set.
I have used mustard seed, wild honey and walnut stain to color them. There is something about these flowers, it always brightens up any project!
Firstly I layered a bed of coconut coir, placed the sun flowers. Then I stamped this lovely tea cups on text papers. I have highlighted the flowers and added a small bling too. I have given an acetate backing to the cups so that they can be propped up! It looks as if the cups are in conversation!
 These are Hot Off The Press stamps, the sentiment too!
As you turn the box around, I have clipped an Ideology paper clip using a brad. Some paper scraps with inked edges hang on the back side for those eureka moments after sipping your favorite cuppa!
I would like to enter this is the following challenges...
Cherry Lynn Designs- Things with wings
Crafty Creations- Takes two ( 2 sun flowers, 2 cups, 2 bling and 2 pairs of bottle cap feet!)
Dream Valley Designs- autumn colors
Little Red wagon- Try something new( new paper pack, new stamps)
Our Creative Corner- shades of autumn
Rubber dance Art Stamps- celebration( have used the Nov’14 colors)
Scrapping 4 Fun – Branded scrapping paper ( Graphic 45 and DCWV)
Thank you so much for stopping by.
Until my next creative Journey,
Happy Crafting and recycling.
Cheers.