Sunday 14 December 2014

A Celestial Thought!

Hello crafters..
I am back today with my last post for this year! This month we have “CELESTIAL” as the theme at Anything But A Card Challenge Blog this month. As always you can make anything BUT a card, but keep the theme in mind!
It took me a while to get cracking on this theme…I could only think of the wintery night skies and twinkling stars when I thought of Celestial!
So taking inspiration from the colors of the night blue skies and the silver stars…I have altered a book box using one of my art prints.

What’s new??? I tried my hand at bees wax collage too…oh! I have no words to describe this experience…a bit sticky though but just LOVED the look of the end product. The bit hazy and vintage look…just PERFECT!
I had made this acrylic work on canvas about 5 yrs back and somehow thought it was incomplete. It was just waiting to be altered for this…I took a print out of my art work and decided to make a collage on the box cover.
I was just too excited to use my new Darice mini iron and the bees wax, I forgot to take the “in process” photos and my fingers  were too sticky too, Lol!
Once I was happy with the collage pieces, I warmed the box with heat gun and after melting the bees wax, applied a cot on the box and then layered the collage pieces with more bees wax..remembering to fuse the layers by heating with heat gun!

A totally different experience…no glue at all! What more, I added a drop of aroma oil to the wax and as it melted…the room was ….oooooo smelling of lavender!
I LOVE IT! So relaxing in all ways….
Ok, onto the project…
Once I fused the layers, I warmed the top layer of the wax and as it was warm pressed a bg stamp on the corners and before it cooled I applied some silver perfect pearls all around!

I splattered blue acrylic paint all around the lid edges, took a silver net ribbon and tied a bow on one end of the box.
The box was incomplete without a flower and so I made a TH tattered flower, vintage style with DI, stamping and some metallic flower center. 
The box cover just compliments this beautiful lady! I couldn’t resist a last minute sentiment on the box that says it all! I stamped it on tissue and adhered with more bees wax. The stamp is from paper Artsy…hot and fresh form my brother’s suitcase, lol!

This silver box is just the right gift for my cousin who is celebrating her silver wedding anniversary next week! I am going to fill it with some goodies…so when you open the box , this is what you see.

I have lined the inside of the box too with silver net ribbon and stuck some vintage print PP in blue and white on both the sides.
For the back I have stuck a lovely handmade paper in blue and silver which I got from Auroville(Pondicherry)…what a finale to the box!

The paper has an embossed pattern and you have to touch to see it and smell to get the aroma, lol!
I am happy with how the box turned out except I still feel it is little waxy to touch. Have I missed out on anything here, please let me know how to buff it and bring out the shine. I like the dull, hazy look…But I want it complete!
I can’t wait to hear your comments on this and suggestions too for the buffing! Thank you so much for stopping by and hope to see you play along on this them. Do take time to visit some lovely creations by our team members every week.
Wishing all of you a Merry Christmas, Happy New Year and Happy holidays too. I am off on a break, my Bro is visiting me from London and I can’t wait to catch up with him and see what he has got for me! I gave him a big crafty list, lol!
Until my next creative journey with the new crafty stuff…
Happy Crafting and Re Cycling.
Cheers.
I am linking this to the following challenges…
KraftZone- Bingo with a box(1st column vertically and last row diagonally)
Inspiration Destination – Anything Goes
Artist Trading Post- Celebrate ( my cousin’s 25th wedding anniversary)
That’s Crafty Challenge – Anything Goes
613 Avenue Create- anything goes with option of gift packaging


Love for vintage!

Hello crafters...
Am here not to share any project but to let you all know about a mega Christmas give away! My love for anything vintage is no secret and I was in for huge surprise when I visited a A Vintage Journey Challenge Blog blog today.
Some amazing  creations by all the Dt"s for their teamies as Christmas gifts and for all the participants and visitors, there is give away. So do visit them and am sure you will be in a for visual treat and if you can win, that's a bonus.
Click here, for more details.
Merry Christmas and a Happy New year to all of you. Will be back soon with my post!
Until Then,
Happy Crafting and Recycling
Hugs.

Friday 12 December 2014

Brrr...It's cold here!

Hello crafters..
I am here with my last post for Scrapping4Fun…yes it’s sad but on the brighter side I had a great time with my teamies and Rachelle, a great leader to work with! . Thank you Rachelle…I learnt a lot  for as first time DT!
As for the challenge this time…it is…

Isn't it really cute...I hope to see you all play along. You can create a card, LO, mini album or "off the page" creations too...Do hop over here to see some amazing DT creations.
And I went with Winter. Yes, it is winter in this part of India( Bangalore) too but not freezing cold! I have never experienced snow till date and its my dream to  see, feel and touch snow and experience that kind of winter! Well, some day…

So, for me winter is White and snow capped nature and drawing inspiration form thet I have an altered project today. Have a look…\If you are thinking this is an altered picture frame, NO it is not. Hang on till the end to see what it is!
 Firstly I sanded the wooden square and applied a generous coat of gesso. 
Then I did some stenciling with TH cargo alphabets and sprinkled some glitter too when it was wet. I did some random stamping and added some die cuts from my stash too and sanded texture paste too in places.
Once this was dry, I created a photo mat behind so that the photo can be changed now and then…who likes to see the same thing all the year round! I love the expression on this little girls face…cuddling up with that warm teddy. I knew she had to be here. I got her from We Love Vintage Challenge blog...they have some amazing vintage pics.

I started working on the embellishments next…I altered a few modge melts here, the flourish and the border, I colored it with acrylics.
 The dragon fly got some more special treatment…has rock candy distress crackle paint and then colored it in brown to highlight the cracks. Love it!

I gathered a floral arrangement with some hand made flowers in one corner and randomly stuck words from the chit chat stickers, all related to the Season, no doubt!

I then twisted a wire for the hanging with some jingle bells and made a matching tag with a bow. The tag too has some stencil work, glitter and the seasons greetings!
 Finally I applied gesso around the edges of the frame and on all the embellishments o give the winter feel and snow capped elements.
 Brrrr….isn’t it cold..this is my first experience with snow, lol!
Now are you ready to see what I have re cycled here…

Frankly, I didn’t know what it is called, so thought I will keep this till the end. Thanks for your patience and hope to her your comments, they all make me smile.
I would like this little girl to enter the following challenges…
Mixed Media Monthly Challenges-Tic tac Toe ( have use bow, ribbon and glitter and also column 3)
Artistic Inspirations – Snow
A Vintage Journey _ Let's celebrate
Alphabet Challenge Blog – ‘V’ for variety( have used e diff embellishments..bells, flowers and modge melts)
Creative Moments – Winter
The Sisterhood of Crafters – Name that tune (jingle bells, jingle bells)

Until my next creative journey,
Happy Crafting and Recycling

Big Hugs.


Monday 8 December 2014

Jack 'n' Jill in a pail !!

Hello Crafters,
This year is going to be over soooon….unbelievable, but don’t we love this month??? I love it, vacations, family meets and holidays and looking forward towards a brand new year…but before that we have assessments and exams in school and next week is going to be busy sitting with my little one to prepare for her tests!
I am going to do as much possible this week and today I bring to you yet another altered project, vintage style deeply influenced by the master, Tim. It’s actually re created  a scene from his wall flower paper pack… It takes a different eye and different set of hands to do what he does, Lol…but to each, his style!

 The master who taught distressing and grunge and texture…this one is for you!
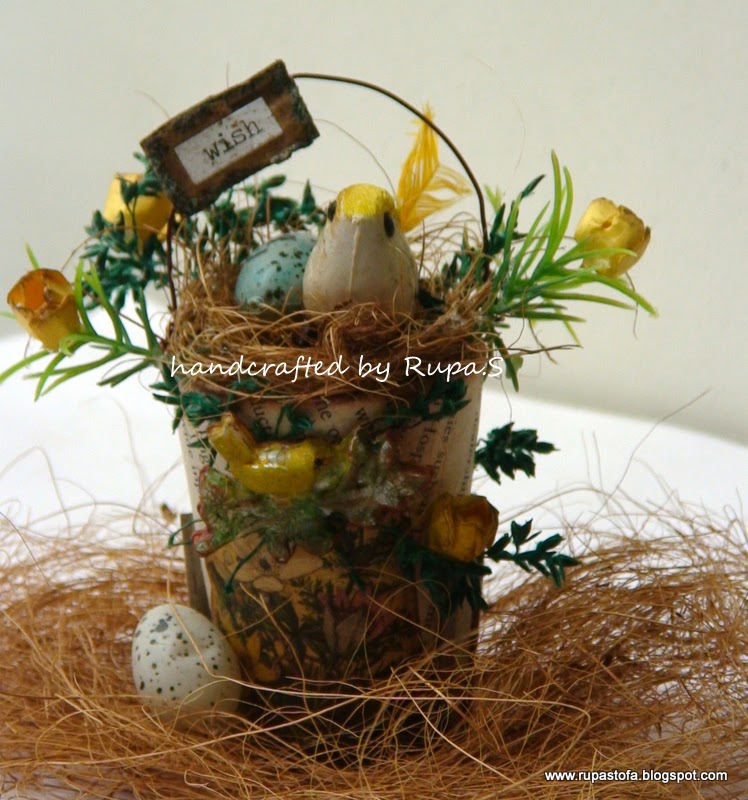
 I altered a mini pail, well not actually a pail but a container which once had some yummy chocolate mousse in it! My little one loves the inside of it and I was just waiting for her to finish the contents and give me the container. Lol!
Have look…I didn't
think twice to alter it but it took me a whole day to work around this miniature! The wall flower paper pack is my current fav and I cut this 3 inch square from the book with a heavy heart!

First, I adhered a piece of paper from an old novel on the pail and inked it with vintage photo then fussy cut this pp and stuck it there. The yellow flowers and the bird caught my eye and that is what I wanted to re create with a lot of foliage!
I altered a modge melt bird with rock candy distress crackle and then highlighted the cracks with paints…look at that! It has a cracked porcelain look right??? This is “jack” and decided he needed a partner and so I brought in “Jill”, perched on top of the pail!

I had lots of ready made foliage peeking out of the pail and then stuffed in some coconut coir actually lots of it to make a lovely nest and I dint spare Jill too…altered it with crackle paint too! Jill is happily nested with a little white egg which I inked with broken china.

 I heated up a piercing tool and poked it thru the plastic pail to create 2 holes so I could string a cooper wire to make the handle. I grunged up a little piece of corrugated cardboard with sand textured texture paste and stuck a chit chat sentiment and had it hanging from the handle!

The yellow flowers are all the smallest one from the TH tattered florals which have been curled up to form tiny buds hanging from the foliage.
Are you ready for the other side of the pail…
I have a little fence running all around the pail. These are actually remnants of the bird cage die…the pieces that fall of the nest, lol!  I have distressed it and trimmed it to match the height of the pail!
 A few foliage from the fence too  and this lovely sentiment from TH visual artistry set says it all at the back. I love it!

You may wonder why it took me a day to do this..but I visualized each and every bit here before actually working on it and loved every inch of this mini pail.
Do you want to know how BIG this is…have a look! So that’s the scene from the wall flower paper pack with Jack and Jill…

My inky fingers are a proof for all the distressing, lol! 
Hope you liked it. Do let me know, I love reading your thoughts, they always bring a smile to my face.
I would like Jack and Jill to enter the following challenges…

A VintageJourney – birds of a Feather
The ArtisticStamper – Anything Goes
SweetStamping Challenge Blog- Things with wings
613 Avenue create – Anything Goes with recipe..I have used column #2
Sugar Creek Hollow - No cards
The Mirror Crack'd - Re cycle/ Up cycle
Until my next creative Journey…
Happy Crafting and Re cycling,
Big Hugs.