Monday 29 June 2015

In the Beach...

Hello crafty peeps..
I wasn't planning to have a post now but couldn't resist playing some of the challenges which had beach and summer themes!
My daughter of 5yrs is such an outdoor person as much as I am though she is more expressive. A few years back we had been to Goa, she was just about 3 then and she took to the beach like a pro. She loved rolling in the sand,playing in the water and of course sun bathing like the other tourists there!
I wanted to capture this memory and have created a mixed media page with a click of her.

She was busy at work and I thought I will give a nice background . This is yet another page from the story book that I am altering!

 I hope to bind a couple of them to get a lovely journal and intend documenting some lovely memories. You may see a few coming in the future!
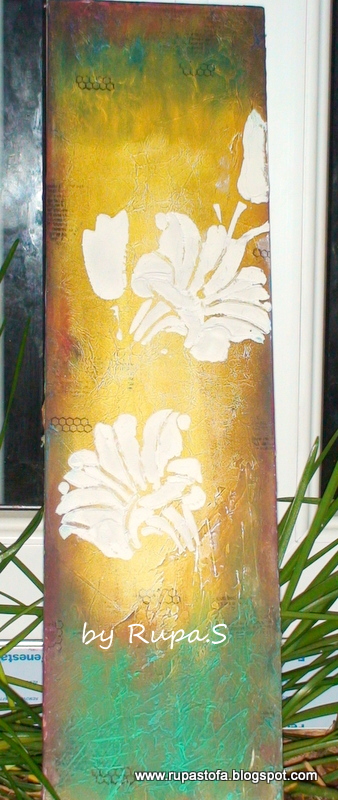
As for this page, I chose the beachy colors and yes this is my first experiment with gelatos! I loved the bright colors and had a lovely time messing up my fingers.
I can imagine how much the little one would have enjoyed messing herself up in the beach, lol!
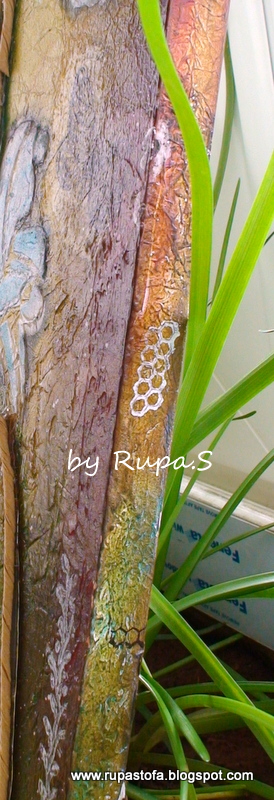
First i just slapped in some gesso on the page and smoothed it with a palette knife to get a mild texture and then worked with gelatos when it was dry.Once the background was done, I used the Prima bubbles stencil and some ink sprays to darken the blue in that area and had the picture mounted in layer's.
Some random script stamping witn Bo bunny and some crabs and rocks using Micia stamps and of course some beachy foliage and shells too!


I made a small tear at the top and had some net peeking behind it. A resin flower colored with alcohol inks and a Prima junkyard finding fits in snugly in that space.

As for the other embellishments, I have used some hand made flowers using CLD shastha daisy, rosettes with punched edges,resin shells and some real shells too, some of which have been gessoed and colored.

The edges of the page have been inked with Prima chalk edger Blossom tree and then Black soot DI. The sentiment is hand written.
I hope you enjoyed the stroll in the beach. Linking to the following challenges..
Lulupu - Summer splash
All sorts challenge blog- Blue as ocean
Frilly and Funkie - Summer
Brown Sugar Challenge Blog - summer fun

Scrap Around The World Challenge Blog- mood board


Simon Monday Challenge - Summer
Until my next Creative Journey,
Happy crafting and Recycling,
Cheers

Sunday 28 June 2015

In the spotlight and a mini challenge

Hi Crafty peeps,
I am in the spotlight this month at Anything But A Card Challenge Blog and also playing host to a mini challenge this week.
So what are you waiting for...hop over to read all about me, my works and the mini challenge.
Do leave your views and hope to see you all play along! Have a great week friends.
Hugs.

Wednesday 17 June 2015

Never regret..

Hello Crafty peeps…
Welcome to my page today and I would like to thank my “new followers” too. Today, I share with you something totally out my comfort zone, something new to me…I am nervous!
My first ever “Art Journal page” !! You heard it right! I am surprised too how I took the plunge, but I had to do it to tell myself that “anything is possible”. There is always a first time and with due respect to all the talented mixed media artists and art journal artists…I know we have many of them in blogland and some of them are close friends too! I sincerely seek an honest opinion from all of you as this will help me improve from my baby steps to walk steadily!
My mom recently gave me a whole lot of story books that I had read as a toddler and I thought this would be a perfect way to alter those children’s book and keep then as memories.
These were published in the 1970’s and this particular book had some water illustrations and I decided to keep this little bird on the branch as the focus and work around it. The theme that I have chosen is close to my heart, summer, nature, outdoor and I have kept to warm bright colors. At least something from my comfort zone, lol!
This is what it looks like now!
I gave a coat of gesso all over the page, except around the bird and also stuck some tissue with gel medium on the base for texture. Then I went about making my own sprays with acrylics and worked on the background.
I decided on a brick wall here and there using TCW bricks stencil and modeling paste. I have used pastel chalks to color them. I love the distressed look of that too!
I have used the dry pastels to create depth in the greenery and have stamped foliage with a homemade stamp and leaf green archival ink. The flowers are Paper Artsy Jofy stamps. Some are directly stamped and colored and some are stamped on water color paper, colored with pastel pencils, fuzzy cut and then adhered on the page. A few highlights with white gel pen, they just popped from the green fields!
Here is a closer look at the bird on the branch. I re worked on him with my pastel and then gave some highlighting with white gel pen! He had grown old you see…I had to give life to him, lol!
The ivy creepers,(loots of them ) are paper Artsy stamps and I had them hanging all over, even till the brick wall so that a few owls could perch on them!
I shaded the journal edges with pastel chalks and had some white splats all over the page to tone down the colors. I had a tough time choosing on the sentiment for the page…I din’t know if I wanted to share this but then I was not giving up! I really had a great time, after my initial bout of nervousness on trying something new!
After a point, I really started enjoying the layers of colors and seeing the page come alive with the birds and the foliage just made me smile and that is why this quote from Stampendeous. The funky doodled alphabets are from Hero Arts.
Well I am NOT regretting at all…however I am looking for honest opinions from all my artsy crafty friends on this first of its kind page from me!
Hope to be doing more as I fill up the books given to me by my mother!
I would like to link my journal page to the following challenges..
Shopping OurStash Ch Blog – Out on a limb ( use branches)
CraftingMusketeers – shades of summer
Frilly n Funkie – Summer
Mixed MediaMonthly Challenge – Yr of choices (Around the house, new to you, stencil and paste, birds of a feather)
Until my next Creative Journey,
Happy Crafting and Re cycling.

Cheers.


Sunday 14 June 2015

One for my "garden"...

Hello Crafty peeps…
Welcome to my page today. A lovely challenge out at Anything But A Card..”Out and About ”….Celebrate Nature.Create any altered art/mixed media project but no cards please…and you can see some lovely inspirations form then DT’s here.
My recent holiday trip to Europe triggered this project and it was so apt with the theme too! Yet another trash to treasure project…if you have a few empty TP rolls and some old CD’s that you can part with, then you make one too!
I enjoyed the scenic rides around the country side and almost every house had one of these in their garden and how I longed to have one in mine too. Given a choice, I would have just brought back one from one of the gardens but practical issue you see…but never the less, I wasn’t giving up!
I decided to make a miniature of what I wanted so that in the days to come I can have a “real one” if I work hard on that.
For the time being I shall satisfy myself with this…any guesses on what it could be?
Here it is….

A mini log planter garden! Yes, I loved the real ones I saw and knew this had to feature in my garden some day, but this mini sits in my drawing room now!
Here is the process..
I cut the TP’s in various heights with hand to revel a rugged edge. Then I gave it a mild coat of texture paste and then used my acrylics and use the “dry brush technique” to get the wood log. Once the logs were ready, I adhered some white sand to an unused CD and then stuck the logs ion there.
This garden is in full bloom…the foliage, the leaves and plants are all die cuts. I cut a whole bunch of leaves with CLD tropical leaves and used florists wire to make mini plants and shrubs. I have inked the leaves to make it look real and the ferns are  from Tattered lace.
The tiny flowers are from CLD Shasta daisy and also joy crafts, inked and in full bloom in the garden. I filled the logs too with white sand and had the plants and planted in there and they started to bloom too!
With so much of freshness and life, the butterflies had to appear. I stamped some Bo Bunny butterflies on text paper and colored them with DI and had them perched near their comfort zone. I think they look happy there.
I had this lovely quote from Stampendeous and decided to have them nailed on the log! I stamped the quote on canvas cloth, distressed the edges of the canvas with distress tool and made some “faux rusted” nails to fix them on to the log. Of course with the daily watering and the outdoor life, the nails had to rust, lol!
I layered some TP logs as feet for the mini garden!
Shall we take a 360 degree turn to see what’s behind?
Here it is…it must be a dream house, lol! I would love to hang in there all day long, what say?
I made a cute little bird hole in the log, used some coconut coir for nest and made eggs with air dry clay. 

The bird is a resin mold painted with acrylics.
So, that’s my happy little place and some day I hope to make this dream come true. Hope this inspires you to play along.
I would like to have my logs enter the following challenges…
Unruly paperArts- Great outdoors
2 Creativechicks – AG no cards
Simon MondayChallenge – For the love of plants
Crafty Gals- Great outdoors
Re cycle, Repurpose, Re invent – AG but must re cycle.
Until my next Creative Journey,
Happy Crafting and Re cycling
Cheers.


Tuesday 9 June 2015

"EYE" care for HIM...

Hello Crafty peeps…
A big warm welcome to my followers and I hope I keep the interest on! Today I am sharing an altered art…trash to treasure project with you. This box had seen its day…I happened to clean my husband’s wardrobe and I saw this “poor little thing” untouched for a long long time in the corner.It was time for a make over!
I just knew what I was going to do…a lovely gift for “the man in my life”! It’s our 20th wedding anniversary in a weeks time and I thought he deserved something that he would treasure too, other than me, lol!
He will use this every day, he will see it every day and it will take care of his daily essential…he can’t do without it…any guesses???
I care for his “Eye care” and so this was born….

Have I told you before that I LOVE making masculine projects…I love the grunge, texture and colors that go with them and the fact that I don’t have to make flowers, lol!
Time to get messy again…here are the steps.
I first covered this plastic box.. You heard it right…PLASTIC box with tissue paper. Then I went about creating textures with Prima basket weave stencil, TH alphabets stencil and some modeling paste. I also stuck some dry wall tape in places and gave a coat of gesso.
I took my acrylic tubes, some metallic colors and Inka Gold and had a blast coloring, shading and highlighting! This is one process I enjoyed…the black brown base and then the highlights with metallic green and blue just brought life to this box! I rubbed some “old gold” Inka gold too…isn’t he looking handsome after the initial makeover???
Just look at the texture, grunge, colors   up close… feel like touching, don’t you (naughty, naughty). I am in LOVE…
At this stage, I decided to bring “The man” himself…have a look!
I took a print out of this vintage man,first fuzzy cut him, them adhered him onto old text paper. Next I gave him 3 coats of clear UTEE, allowed him to cool! Then I bent him and twisted …I know that’s a lot of torture here but that’s what gave me this lovely “faux cracked glass” effect! So so Vintage…I bet he is not complaining, I am not, lol!
I then rubbed the vintage photo DI directly over him and then blended just to see how the cracks absorbed the ink and he was looking even more handsome! A closer look and you can see the text thru him…how cool is that! I am in LOVE again…
I gave “The man” some color and texture by placing him over a piece of yellow fiber paper and he looked comfortable and just “popped” from the back ground!
Time for embellishing…I made a set of gears and gave it the same treatment as the box. I can’t get enough of these colors! I connected with a metal chain and had them “locked” too!
I altered some bottle caps with the same colors…I told you I can’t get enough of them…and voila, my box stands proudly on it!
3 little words on the top…say it all. Well not the conventional words…something different here…a brad and another gear holds it in place!

This is back side…I think he looks great all around, lol!
Shall we open it…(wink)…I am feeling naughty here, lol!
For the inside, I have adhered some old text per which has been inked with Tea Dye DI and for the base, I ran a piece of blue foam thru an embossing folder. A perfect “seating” for the eye care!
I had this gros grain ribbon in my stash and thought would cover the ugly joint with that.
And with that we come to the end of this project. Thank you so much for your patience and your visit today. I would love to hear your views and comments on this project.
I would like to have “my man” enter the following challenges…
Anything Butcute –Make it masculine
SimplyCreate Too – Masculine
Dream valleyChallenges – father’s day
Crafty BootsChallenge – For the man in your life
Craftin DesertDiva’s – Father’s day
Love ToScrap Challenge – Male call
A VintageJourney –Celebrations (our wedding anniversary)
Stamps and Stencils -Small is beautiful
Until my next Creative Journey,
Happy Crafting and Recycling
Cheers.


Sunday 7 June 2015

One for the "Creative Soul"

Hello Friends…
A sunny welcome to all of you. I have great pleasure and joy in sharing today’s project because it’s the first of its kind from me!
No! Not a card…
A pure mixed media art and why did I do that??? 
I got myself a new craft room…yay!!! Actually a second one…this is inside the house, a balcony converted into a study/craft room so that me and my little one get to share it. This is supposed to be the “messy zone” in the entire house! I just love it and what better way to celebrate the opening of this room …to create something that goes with the flow. 

Time to get messy…
I have to admit, this room has a great vibe…lots of light and sunshine, a view to the outside greenery, a tree close by with birds chirping and some indoor foliage which is brimming with the seasonal lilies right now! Do you get the picture…this being the muse, I decided to satisfy my soul with new mediums, colors and techniques I haven’t tried before.
I just had the following things in mind before doing this project…
Altered art- NO
3D embellishments – NO
Bright Colors – YES
New colors and techniques – a big YES
Re cycling - OFCOURSE
So here it is…one for my creative soul!
Last month I re structured and did my entire kitchen and had this long wooden, panel which was laminated with white mica sheet on both sides. I knew this would come handy some day and it was just perfect for the mixed media panel as I wanted loooong lilies smiling at me in the room even on days they weren’t blooming, lol!
Here are the steps…
I covered the entire panel with tissue paper that comes with shirt packaging. I then gessoed it and it was ready for the paints. I applied some modeling paste with the spatula on the base to create some rocky texture.
I have not experimented with brayers and took that out first and this lovely range of colors from Paper Artsy that my brother got me when he visited early this year.
I started by brayering the lighter colors and then moved on to the darker shaded using the Vaseline technique to reveal a bi of the earlier colors to show thru.
Once the base colors were ready I added more colors with my chalk pastels, which again had been in “cold storage” for a long time. I liked the way, it blended and took to the textures of the tissue base and I could easily go on adding colors to give the panel some depth.
Next came more modeling paste and the long floral stencil. As that was drying, I went about doing some random text stamping with Bo Bunny and archival inks. 
There are also some vines stamped with picket fence paint. I then stamped some butterflies and bees on tissue so that they have some “conversation” with the flowers!
Next was to get them on the panel with gel medium and once that was done, I decided to give some color to the flowers.
The panel was already colorful so I kept the flower simple, by just sponging on some powder blue acrylic color thru the stencil. I used rolled paper rope as stem for the flowers. By now the panel was coming alive and already speaking to me!
I chose this “perfect” quote from Paper Artsy and heat embossed it in white on black CS and cut out small strips. I glued them onto the panel and highlighted them with white gel pen.
A few random white color splashes and my summery panel is ready! I sealed the entire work with a generous coat of spray varnish. This is really adding so much life to my room and will be a source of my “daily” inspiration.
Do let me know your views on my maiden attempt on this “mixed media art”…there are so many of you who have inspired and BIG THANKS to all my crafty pals.
I would like to have my summer panel enter the following challenges…
The MixedMedia Monthly Challenge Blog – yr of choices (around the house, new to you, May flowers, stencils and paste)
ArtisticStamper Ch Blog – Summer is coming
Take it makeit Challenge – take a technique – texture
A Vintage Journey – Celebration (my new craft room!)
SweetStamping Ch Blog – Something old something new

Until My next Creative Journey,
Happy Crafting and Re cycling
Cheers.


Wednesday 3 June 2015

Framed up!

Hello Friends…
A warm welcome to all of you visiting me today and to those who have become my new followers. Summer is at its peak now with occasional showers in the evening making things bright and beautiful outside.
With that in mind and colors that I have not used much before, I share today yet another re cycled project. This time it’s the good old cereal carton, which I have been collecting and is my favorite trash which sees the light in many of my projects.
So, today with 2 empty cartons I made a photo frame and embellished it too. All of the papers and embellishments are also from my stash and left over’s from my previous projects. It really satisfies me to use up all of those old stuff and come out with something totally new!
Red, is a color I rarely use and this time I wanted to highlight that color. I made the front frame panel with one empty carton, wrapped it with DCWV botanical stack PP. Love the red stripes here and the went about adding layers of stamping, stenciling and texture work.
I used transparent texture paste thru a locally bought leaf stencil and as the pate was drying I sprinkled some platinum UTEE. Once the paste dried, I heat set it and I loved the texture the UTEE gives…platinum leaves , lol!
I used TCW bricks stencil and potting soil archival ink and stamped some music notes and butterflies too using Bo Bunny and Kaiserkraft stamps. The clocks are using Prime stencil and crackle texture paste.

The supporting back frame is also made with an empty carton and I glued the front panel on 3 sides and kept one side free to slip in the photograph. The Frame is now ready to be embellished.
A side view of the frame…you can see that the inside of the panel is lined with old text papers, another fav that I like to use in my projects.
A floral cluster on one side with a big red rose using Joy crafts die and the white flowers are made using some lace from my stash. The tiny flowers are using CLD cuties fringe die. The flowers lie upon a bed of coconut coir, I have loads of them that love to use for dimension. The leaves are from die nemics and Tattered lace dies.
The butterfly too is made from lace and for the body I have used copper wire and small yellow crystal beads. I ribbed gesso on the raised ares of the lace just for added interest.
The TH hardware findings die cut got a coat of picket fence D crackle paint and have rubbed in old gold in the cracks. The bright yellow banner with the sentiment is from Marianne  Designs die and stamp set.
The little girl with the cat image is a down load from We Love Vintage Challenge blog where they always have a good collection of pictures.
I love making this type of a frame from scratch, especially from house hold trash and hope to hear from you on this.
Before I can take leave, I want you to see what is on the other side too! Of course, how can that be ignored…
I stamped this lovely quote from Paper Artsy and on side have a loopy bow. The “LOVE” badge is a handmade one using air drying clay and I stamped the word on it. Once dry, I have colored it with brushed pewter and walnut stain DS. The honey comb stencil is from Heidi’s swap and I have used crackle texture paste and Inka gold here too.
 So, you get to see something on both the sides…that’s the advantage of making your own frame, lol!
I would like this frame to enter the following challenges…
SOS – Red, Red, Wine
Lessology – lace Up
Cherry LynnDesigns – red, white Blue
Until my next Creative Journey,
Happy Crafting and Re cycling.
Cheers