Friday 26 August 2016

Journey of a sweet box!

Good morning!
Welcome to my page today!
I am back with an altered project share. The other day a friend dropped by home and handed me a sack full...yes A SACK FULL of abandoned and discarded stuff from her home!
What more do I need...I had no words to thank her and could only think of the possibilities of what could happen to all this trash...even as she was pulling them out of the sack to show me, my mind was already dancing and my fingers itchy!
From that day I have been dishing out one thing at a time and transformed hem and now it was time to alter this cheap plastic frame she had pulled out from a sweet box decoration! 
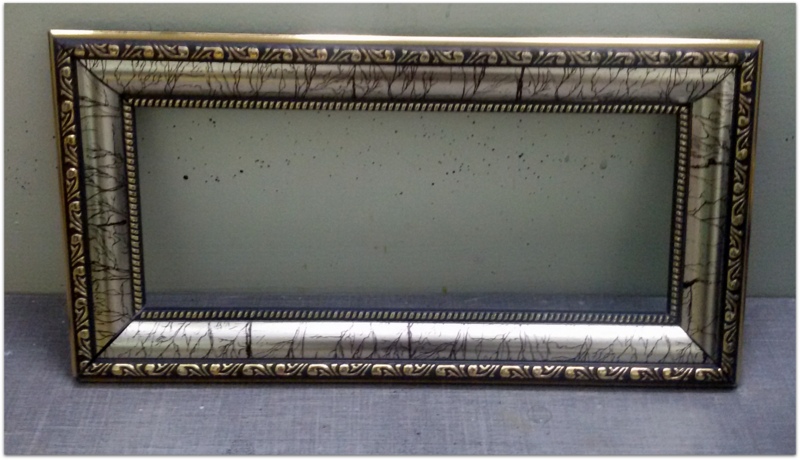
This had no backing and the frame that was left had cracks too...but I was not giving up!
It gives me immense joy to actually altered such stuff and give them a new life and purpose! A few hours and it became this....
I was deeply influenced and inspired by a few challenges this month and knew exactly what was going to happen this frame, the moment it hit my craft table. It was destined to get transformed from a sweet box decoration to this shabby chic decor piece!
I prepped the frame with a coat of gesso and then worked with some stencils and texture paste. The place was limited, so kept it simple and waited for it to dry.
I then gave the base coat of teal by mixing some blue and green acrylic paints (Folk ART Multi surface paints) and as that dried went to create cracks. 
I used different methods here ... the one step crackle from deco Art, then it was the white glue technique and then finally some dry brushing and sanding too! I rubbed some archival brown to age it too!


Yes, all these brought out the age and weathered look keeping the chic element intact, lol! I covered the top with white paint and the peeps of teal from all the above crackling techniques just about added so much texture to the already existing ornate frame work!
Since it had no backing, I made one from a chipped wooden plank that I had. Created cracks on the exposed part and aged it with burnt amber too.
I took the focal point from the lovely paper pack from Bob and Betty (floral logs). Loved the lavenders, teals and the greens and blooms amidst the cracked and chipped wooden log!
This mage create some hand made blooms(which I had not been making for some time now) using my fav TH tattered florals die.
I kept the colors to lavender and teal using DI peacock feathers and seedless preserves. Some die cut leaves and a cherub using air dry clay were all the embellishments to go on the frame.
I mounted the frame on to the wooden backing and went about placing the flowers.
I had it as a top arrangement on a bed of bandage gauze and some white lace.
I made a little banner with chipboard and gave it the faux wood treatment using dry brushing and stamped in tie quote “ Bloomin’ Lovely” with Archival black and had some color splats and some brads on it.
A little nest using coconut coir and some little blooms in this corner makes it cozy and warm too!
The frame was ready to stand on its own, anywhere now showing off its new life!
I enjoyed making this totally shabby chic style project and making those blooms after long time was just so therapeutic.

Here is an aerial view...
I want to take this to the following challenges which inspired me...
Frilly and Funkie- Floral Infatuation
Anything But Cute- Shabby mood board
Blog Quick Quotes- create flowers
Crafty Boots Ch- Anything But A card
MOO MANIA- Natures beauty
A Vintage Journey- Stencil it
Thank you so much for stopping by today.
Until my next creative journey,
Happy crafting and recycling.
Cheers.


Saturday 20 August 2016

What we Love!

Good morning!
Welcome to my page today! My project share for today is something really small but yes an altered one!
Normally albums are made and then the box or cover is designed to fit the album,but in this case, I had small box with me(looks like a book box) which I altered to fit in an accordion album!
The box measures 4 inches by 3 inches and opens up with a pearl and elastic closure and a pretty sturdy one and I was no way chucking this one in the dustbin. I decided to make a tiny memory box for my daughter to capture her solo moments in every stage of life.
You know how little girls are and their love for pinks! So I kept that in mind and worked with these gorgeous papers from Papericious, Love in Italy paper stack.
Again I was careful to choose the pinky ones and yes of course some neutral ones too! They had lovely prints of the Eiffel tower, birds and flowers ( all of which are my daughter’s favorites) and so it was just easy on that part.
The box was so tiny I had to actually make a custom made accordion to fit in but the depth being more, I knew I could fit in more pics. So I went ahead and made something like a gatefold accordion! 
Well suit your needs...It had accordion opening from both the sides and there are pockets and small journaling tags too.
It can easily hold upto 20-25 pictures! 
Isn’t that awesome for a mini, mini album!
I wanted to make the lid something really different yet catchy for a 7 year old! I wanted it to reflect my taste and yet make her want to have it! Now is that asking for too much!
I decoupaged a lovely little angel on to the box after a coat of gesso and then fit in a negative die cut on top to make a frame. Then I layered some crushed tissue , found objects, an Eiffel tower made from air dry clay, lace, corrugated cardboard, some twine, a broken butterfly charm...yup all of this on one side of that tiny lid!
Then I covered the entire box with black gesso and start to dry brush some paints from Deco Art. I was careful to use more green and less pink here ( the way I wanted!) and once dry, I also dry brushed some gesso(white) on it.
I love the antique kind of look that comes with dry brushing. 
And for the middle part of the box, I rubbed some silver metallic lustre from Deco Art . The black with silver gave an aged metallic look which went pretty well with the pinks on top!
I heat embossed a little quote in white near the closure and also added some pink bling (to satisfy her soul now, lol) on the base of the box.
As part of the final embellishment that would catch her fancy, I made handmade flower using TH tattered florals die and used DI(worn lipstick) to color it and along with some store bought peace lilies and die cut leaves, the box had a bright new life!
I covered the entire box with Ultra matt varnish too from Deco art and yes, my box was sealed and protected to hold a life time of memories of my little girl. I hope to fill this up in the years to come and hand it over when I think she can actually treasure it!
So my like + plus her like = to happy mom and daughter!
Thanks for stopping by today and let me know how liked this altered box.
I would like to take this to the following challenges...
Frilly and Funkie- It’s a small small world
Alphabet Ch Blog- M for mythical
Brown Sugar Ch blog-Lace and bling
All sorts Ch blog- fabulous florals

Until my next creative journey,
Happy crafting and recycling.

Cheers.


Wednesday 17 August 2016

Graphic 45 and Folk art paints...a fusion!

Hello Crafty friends,
I am here with my post for Crafters corner and this time too I have saved another box from hitting the trash can, lol!
here is how it looked when i laid my hands on.
..
and here's a seek peek on what it turned out to be and there is little SURPRISE inside too!

Well head over to Crafters Corner blog to see a detailed write up and loads of pictures of the transformation and well don't forget to let me know what you think of it.

Until my next creative journey,
Happy crafting and re cycling
Cheers.

Monday 8 August 2016

HOPE...a new beginning.

Hello crafty friends..
Welcome to my page today. Today’s altered project is miniatures! I had this set of identical trash with me and thought they had scope to become a decor piece!
Once they hit my craft table and a few hours later, they became THIS.....
I have tried Deco Art chalky paints for glass on these bottles! I love the matt finish and the rest of it was easy.
The lovely floral patterns that I have used in the tissue reminded me of my summer garden in bloom! All fresh and colorful just after a mild shower.
The caps have been altered using air dry clay and to give the feeling of “mushrooms”, have painted them with co coordinating acrylic colors and also polka dots!
The weathered look finally is by dabbing burnt umber and adds that woody look to this project.
Keeping in mind the saying...WHERE THERE ARE FLOWERS, THERE IS HOPE...I die cut these alphabets in chipboard, inked them and had them stand on the lid!
A new day, a new beginning and waking up to “hope” every day! Now that’s quite motivating and a sight to begin the day with!
Hope you liked the new life of these bottles, do let me know.
I would like to take them to the following challenges...
OLLCB- ribbons and bows
Berry71bleu- Summer hideaway
Scrapki-wyzwaniowo- meadow flowers
Until my next creative journey,
Happy crafting and recycling.
Cheers.


Wednesday 3 August 2016

All sprayed up !

Hello Crafty friends,
Welcome to my page today.
My post at Crafters Corner is up and am there with another experiment with Folk Art Multi surface paints.
This time I have used them as sprays!
Here is what I altered this time, a discarded leather box

 and I turned it into a keep sake box for my husband!
A sneak peak here.....

For full details, do visit crafters corner blog and let me know your views.
 Until my next creative journey,
Happy crafting and recycling.
Cheers.


Monday 1 August 2016

Over a bottle!

Hello crafty friends..
Welcome to my page today.
Its the beginning of the month and new challenge at Rhedd’s Creative Spirit. The rules are simple, its always Mixed media or Altered Art and NO Cards!
For this month, I went about altering a bottle. I so loved the shape of the bottle and just wanted to play with textures.
 I prepped the bottle with 2 coats of Deco Art chalky paints for glass. I drew some patterns with home made texture paste directly on to the bottle using a plastic cone. 

I went about decoupaging these lovely flowers as the focal point on one side. I
gave a rope border for it and also placed a cherub made from air drying clay and silicon mold.
Then created textures with some crinkled tissue all around.
On the other side too I created a focal point with this


lovely quote from Paper Artsy.
Once all of this was dry, I worked with my home made color sprays . I wanted vintage tones and so stuck with greens and browns.
I liked the subtle coloring with the sprays and wanted the flowers to be the highlight.
Once all of this dried, I gave 2 coats of varnish and worked on some color textures on the cap too!
If you are wondering what those round things are on the bottle, they are just flat back pearls that I stuck for some additional texture!
I hope you take time to visit the Rhedd’s blog to see what the team has in store for you and do play along. We love to see your creations.
Until my next creative journey,
Happy Crafting and re cycling.
Cheers.