Showing posts with label Utee. Show all posts

Tuesday, 9 June 2015

"EYE" care for HIM...

Hello Crafty peeps…
A big warm welcome to my followers and I hope I keep the interest on! Today I am sharing an altered art…trash to treasure project with you. This box had seen its day…I happened to clean my husband’s wardrobe and I saw this “poor little thing” untouched for a long long time in the corner.It was time for a make over!
I just knew what I was going to do…a lovely gift for “the man in my life”! It’s our 20th wedding anniversary in a weeks time and I thought he deserved something that he would treasure too, other than me, lol!
He will use this every day, he will see it every day and it will take care of his daily essential…he can’t do without it…any guesses???
I care for his “Eye care” and so this was born….

Have I told you before that I LOVE making masculine projects…I love the grunge, texture and colors that go with them and the fact that I don’t have to make flowers, lol!
Time to get messy again…here are the steps.
I first covered this plastic box.. You heard it right…PLASTIC box with tissue paper. Then I went about creating textures with Prima basket weave stencil, TH alphabets stencil and some modeling paste. I also stuck some dry wall tape in places and gave a coat of gesso.
I took my acrylic tubes, some metallic colors and Inka Gold and had a blast coloring, shading and highlighting! This is one process I enjoyed…the black brown base and then the highlights with metallic green and blue just brought life to this box! I rubbed some “old gold” Inka gold too…isn’t he looking handsome after the initial makeover???
Just look at the texture, grunge, colors   up close… feel like touching, don’t you (naughty, naughty). I am in LOVE…
At this stage, I decided to bring “The man” himself…have a look!
I took a print out of this vintage man,first fuzzy cut him, them adhered him onto old text paper. Next I gave him 3 coats of clear UTEE, allowed him to cool! Then I bent him and twisted …I know that’s a lot of torture here but that’s what gave me this lovely “faux cracked glass” effect! So so Vintage…I bet he is not complaining, I am not, lol!
I then rubbed the vintage photo DI directly over him and then blended just to see how the cracks absorbed the ink and he was looking even more handsome! A closer look and you can see the text thru him…how cool is that! I am in LOVE again…
I gave “The man” some color and texture by placing him over a piece of yellow fiber paper and he looked comfortable and just “popped” from the back ground!
Time for embellishing…I made a set of gears and gave it the same treatment as the box. I can’t get enough of these colors! I connected with a metal chain and had them “locked” too!
I altered some bottle caps with the same colors…I told you I can’t get enough of them…and voila, my box stands proudly on it!
3 little words on the top…say it all. Well not the conventional words…something different here…a brad and another gear holds it in place!

This is back side…I think he looks great all around, lol!
Shall we open it…(wink)…I am feeling naughty here, lol!
For the inside, I have adhered some old text per which has been inked with Tea Dye DI and for the base, I ran a piece of blue foam thru an embossing folder. A perfect “seating” for the eye care!
I had this gros grain ribbon in my stash and thought would cover the ugly joint with that.
And with that we come to the end of this project. Thank you so much for your patience and your visit today. I would love to hear your views and comments on this project.
I would like to have “my man” enter the following challenges…
Anything Butcute –Make it masculine
SimplyCreate Too – Masculine
Dream valleyChallenges – father’s day
Crafty BootsChallenge – For the man in your life
Craftin DesertDiva’s – Father’s day
Love ToScrap Challenge – Male call
A VintageJourney –Celebrations (our wedding anniversary)
Stamps and Stencils -Small is beautiful
Until my next Creative Journey,
Happy Crafting and Recycling
Cheers.


Sunday, 8 March 2015

GREEN with Envy!

Hello crafters..
Welcome to my page today. I have my DT project with Anything But A Card to share with you today. The theme this month is “Green with Envy”. It is up to you to interpret the theme but yes, we would love to see the color green in your project too. Absolutely anything that your heart fancies except a card! Now that’s the easiest part as you all by now know that I can’t save myself to make a card, lol!

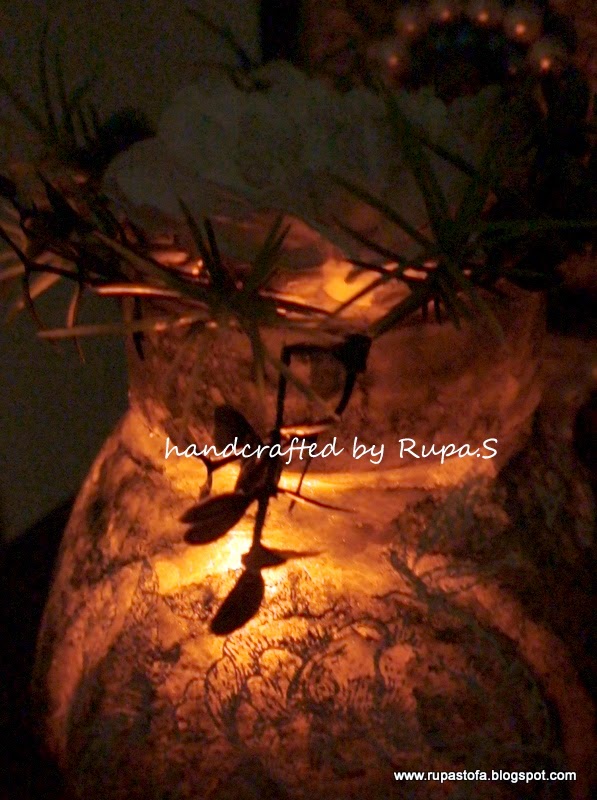
I have altered a little glass jar which for this theme. A plain clear jar on which I first created a “faux Frosted” effect and then dabbed some alcohol inks in green, blue and silver. As you can see, green is dominant here.

My favorite color is green and that is one reason I love all nature inspired projects. This is going to be no different but yes, green is going to be the highlight here. Is there anything as too much green?? No way…right now my garden is bright green with a couple of showers that we had last week and I see some fresh leaves sprouting and a few flowers too. That’s my take on this challenge…but  what about the envy? Let’s wait for that part…

Once the bottle was done, I wanted to do some heat embossing  on the bottle directly which flopped big time! The embossing powder for some reason was not melting…I dint want to experiment, so I went ahead heat embossing the flowers and the quotes on tissue. I did the embossing in white so that it shows against the green.
I love these 2 quotes from Paper Artsy and it was just apt for this project. The lid too has some left over alcohol inks dabbed on it and then I made the mini terrace garden here!

Loooots of green foliage and a focal flower in the center. Just that one flower is enough to brighten that garden. I used Arianna blooms die to layer up this flower and mildly inked it with worn lipstick DI.
A garden is incomplete without some winged beauties and so came the butterfly and the bee!
The butterfly is a Itsy Bitsy die and I shaded it using DI and then dipped in UTEE. Whereas the bee is a stamp which has been colored too with DI and covered with rock candy crackle paint. Which looks better??? Maybe the butterfly is envying the bee for more than one reason now..one maybe it looks better and two, cos its first and up close to the flower, lol!
So you get that “envy” thing now???
I couldn’t stop at that, and then lit a battery operated candle inside and was only surprised at the subtle beauty it radiated with the Buddha sitting next to it.

 I love this click... to me ,it was speaking a different language at that moment!
 The soft glow just grew brighter as the sun dipped.
Hope this inspires you to play along this month and do hop over to see what the teamies have created every week!
I would like to have my mini garden enter the following challenges.
GreatImpression – Go Green
ArtisticInspiration – AG with a twist of green
Crafts 4Eternity – Anything But A Card.
WowEmbossing – Spring (have done heat embossing in white and also UTEE)
Take It Make It Challenge- AG with stamping
All Sorts Challenge - Spring is in the air
Sweet Stampin Challenge - Green for St. Patrick's day
Until My next Creative Journey,
Happy Crafting and Re Cycling
Hugs.


Thursday, 19 February 2015

Musical Tree !

Hello crafters..
I am back after a small break…just a little busy with my little one’s school admission. Now, relieved as I am done and have an admission into a good school close to home!
Today’s project involves my fav colors..are you guessing?? Yes, one is brown (not surprising) and the other yellow!
This combo just adds that “sunshine” to any project…and so am here with an altered wall plaque this time.

The base is an MDF cut out and I had a great time doing this for a “Family” who loves to entertain people and there are so many fond memories in that house for me! I made this for my Aunt and Uncle so that they have it on the door and think of me every time they enter their house! And for every visitor who rings their bell, I thought there will be something interesting to watch until they open the door, lol!

Have a look and tell me….
I have done my favorite tree bark technique using masking tape and homemade texture paste. I hand drew an oval and did the texture work only in the outer boundary and colored it with acrylics. Once satisfied with it, I made my own music sheet paper with archival ink and Bo bunny music notes stamp and inked it with vintage photo and walnut stain to antique it.
 I then inserted this page in the center of the bark and curled out the edges of the bark, so it looks a little dimensional. I love the combination of the vintage music sheet against the tree bark. A musical tree lol!
I was clear about having a spring/summer look…bright and inviting …so went with yellows, a little pink and red color flowers all using CLD sunflower die, Joy crafts, heart felt creations and the small flowers using a circle punch! . I inked them to my requirement and arranged them on the bark.

 The resin flourish is another of my fav and is quite long! I did it in green and then used PVA glue technique to create the crackle and applied yellow color. The yellow and green cracks make it really bright!
Flower clusters on 2 sides with some faux berries made with beads and dipped in blue alcohol inks give that little pop of colors from the flowers.The sunflower centers too have some shiny micro beads!

 The dragon fly too is a resin mold on which I applied rock candy Distress crackle and filled the cracks with brown acrylics.

The alphabets are made using TH marbling technique, I used yellows, oranges, blue and green DI . Applied them on the craft mat, sprit zed water and swooshed in a CS and got a lovely pattern!~ I then cut the alphabets and layered it with another card board alphabet for thickness. I wanted it glossy and so I dipped each one in hot melted UTEE to get a thick coating…just look at those glossy marbled alphabets…

I did the same treatment to the music note die cut with music notes stamped on it!
A little sentiment “May your day be filled with Sunshine” says it all! It is tucked under a sunflower and some coconut coir nest! I just get thet cozy feeling when I see that, do you??? And oh! That BEE…was a last minute addition, my latest buy! A stamp that I heat embossed, colored and dipped in UTEE…a perfect fit near the sun flower! It just had to be there, Lol!

I drilled holes on the top and bottom to have some antique metal chain for the hanging on the top and some antiqued bells ringing in the bottom!
Truly a musical tree…what say friends??

Waiting to hear from you on this...I love sunshine and I love music and this incorporates both of that...Actually it just happened that way and I am so happy it did!
I would like to have my musical tree enter the following challenges…
ArtisticInspiration – Anything Goes with a twist of sunshine
TIOT- Tic Tac Toe ( Beads, Punch, Flowers, flourish and a string of alphabets!)
WhimsyStamps Challenge – Use a sentiment
OCC - Tic tac Toe- (metal, die cuts, embossing powder,stamps, crackle paint)
Craftingfor all Seasons- Punches/ and Dies
InspirationDestination – Anything Goes
LTSCB – Anything Goes
Make MyMonday – Favorite Colors (brown, yellow and green too!)
613 AvenueCreate – Anything Goes with the optional twist of RAK

Until my next creative Journey,
Happy Crafting and Re Cycling.

Big Hugs.

Tuesday, 20 January 2015

Too Early for LOVE???

Hello crafters..
Welcome to my page today…I have a ”New Technique” to share with you and am really excited about it  …well, when am I not???
Before that, I would like to thank you all for the lovely comments you all left on my altered Iron! That was so encouraging. So after a creative exhaust I thought I will try a new technique which I accidentally hit upon on You Tube!
It may a little too early for valentine projects, but somehow I thought a bold, romantic theme would suit this “Faux Leather Technique” that I am totally addicted to. I tried one and then the second and then ended up doing 6 projects with this technique!!

I am going to share 2 with you today…thank your stars for that now, Lol!
I have always loved vintage stuff and faux leather looks good on Kraft Card stock and I was more than happy to cut my CS to small pieces to suit my project.

I had a lot of coffee stained papers from my earlier project, another addiction and thought I needed to do something to preserve this beautiful papers and give them a grand cover…and so I made “faux leather junk journal” !

It is amazing how the Kraft CS takes a good amount of “treatment” to look like leather. sprit zing with water and glycerin about 3 times, squeezing and scrunching to break the fibers, drying it and then running it thru en embossing folder!
Yes, once the wet CS is out of the folder, it has to be dried and then starts the layers and layers of inking! I have experimented with different colors of DI and for this I have tried Fired brick and black soot (valentine, you see) !
For the journal cover, I used a damask embossing folder and once I achieved the desired color, I sealed it with 2 layers of spray varnish. This is what finally gives it the shine and sheen of leather! It is unbelievable how after the entire process, a crisp Kraft CS becomes so flexible and pliable like leather and most importantly, tough!
Do you see a faint image of a vintage romantic couple on the cover???I experimented with printing on tissue paper at home! Another new technique that I learnt!

For the closure, I have used some stretch lace and used Velcro to fasten it. To cover the joint, I made a romantic badge! I have Paper Artsy mini stamps here. Stamped it on CS, colored it and sealed it with 3 coating of Clear UTEE. Pierce a hole and have a little hearty cherub in metal hanging! LOVE….
I have stitched the coffee stained signature to the cover and have attached a beaded dangle with some glass beads and baubles and hold it…a lovely metal cupid charm, all of this hanging from the spine!
The extra twine that hangs after stitching, I brought it to the book center and have looped a small book mark to it!  This time it’s a die cut with the same PP and layers of UTEE…a glitter heart!

You have to touch the faux leather to believe it! I will be back a tutorial on this soon. Bless your souls for a short post from me! Lol…
Next I did a romantic mini using a single piece of 12 X 12 PP from DCWV ,French  Country stack and did a cover for it using the same technique but using another embossing folder.
 I reversed the colors this time, black being more dominant, then red and finally rubbed on some  Inka Gold with my fingers and then sealing it. 
This mini can hold up to 15 pics and also has pockets, tags and inserts.
For the closure here, I have used some silk threads in black and red and the spine here too has some glass baubles and a metal charm..a love letter in an envelope! How romantic is that???

To make it even more romantic, I took this cute Pooh quote from 613 Avenue Create and have made it the focal point in the album cover.
I thought I will make a set for the “romantic hearts” and so the coffee journal and the mini. I think they make a cute pair, what say?

Would love to hear your feedback on this and for those of you who want see my addiction with this technique here are the other 4 journals in different colors.
Have a good look and tell me which color looks the best. I am really looking forward to hearing from you on this.
I would like to enter this twin project in the following challenges…
DreamValley Challenges – Anything Goes
LTSCB – Anything Goes
Loves toCreate Challenge Challenge – Color inspired ( red, browns and black)
Craft Yourpassion – Anything Goes
That CraftPlace – Love / Valentine
613 AvenueCreate – Anything Goes with the option of Winnie quote
CraftingMusketeers- Valentine
WinterWonderland- show us your metal
FrostedDesigns – A New… technique( have tried 2)

Until my next creative journey,
Happy Crafting and Re cycling.

Big hugs.

Saturday, 8 November 2014

Forever "Fall" with a tutorial

Hi Crafters,
Am back in my comfort zone...a project loaded with flowers and embellishments, all hand made! This is purely inspired by my morning walks...the sights and colors that I see. I love to walk thru the scattered leaves and admire their changing colors and textures and as continue a few bursts of colorful blooms in the neighborhood houses peeking out of the wall! Love the yellows, oranges and dark shades of pink thru the woody brown...would love to capture this moment FOREVER and so began this project.


A picture heavy post and I have tried to explain a step by step on the wood bark texture that was much appreciated and I had requests too for a tute. You can see the project here.
This is 360 degrees fall table decor piece, made from an empty Vodka carton! How cool is that...


I made a window in the box and then stuck masking tape all over to get an initial texture.


 Then scooped out my homemade texture paste. For this, I mixed equal quantities of chalk powder(from local hardware store) and white glue with little water to get a pasty consistency and then added some brown acrylic colors and applied it all over.
No, that is not chocolate sauce..just look that yummy texture.

 Once it dries, it's absolutely bark like...AS SIMPLE AS THAT! While you apply the paste on the masking tape, take a spatula and then just make incisions all over and in some places scoop it out to make like knot holes too! After it is dry, you can do the final color shading with further brown and black acrylic colors.
I further sprayed LSG cactus gold to get a slight shimmer too..too bad the camera can't capture it. I then stuck PP from DCWV pack...I crushed the paper and inked it with DI to get the slight texture to go with the bark!


Next cut out a piece of acetate and dabbed in alcohol inks in all fall colors and when that dried, I heat embossed a golden sunflower on both corners! I loved the texture of the alcohol inks.


Now comes the interesting part...I colored scraps of handmade paper with DI in fall colors using Tim's swishing technique...applying the inks on craft mat. spritzing water and swooshing the paper thru it to get a shades of colors. Then I splattered some black paint on it and ran it thru the big shot with TH tattered leaves die to get a handful of lovely fall leaves. Some of them are also using Cheery Lynn tropical leaves die.


I took out some pine cones and berries from my potpourri  deco and altered it a bit, sprayed gold mist and also covered the berried with diamond dust and went about doing the fall arrangement on the top panel.


Top panel...a bed of TH tattered leaves with hand made flowers all using CLD sunflower and shasta daisy die, heavily inked .


the front panel...the acetate widow with ornate metal corners and some more flowers on the sides with a little thank you banner!


And when the tea lights are on.....wow!
Just the moment I wanted to capture...I invite you all home to see this in real!


I told you it is a 360 degrees deco...so on the other side...
Cute little frames in all shapes heat embossed with UTEE platinum and some more hand made flowers.

This is how it looks with some pictures in it...I just slipped in some Xmas pics from the net. This can ofcourse be changed according to the occasion!
I also went a step further and gathered some twigs from the garden, colored it and layered it to form the feet for the box!


So, My "Fall" frozen forever in this little box which will find a place as a center table deco! Do let me know what you think of this project.


I am linking this to the following challenges...
Beyond Grey Challenges - Fall challenge
Decorate To Celebrate - Anything Goes
Divas By Design- Born fire colors
Creative Moments Challenge - Anything goes/ Celebration
Shopping Our Stash Challenge - Leaf me alone
Try it On Tuesday- colors of autumn
Sugar Creek Hollow - Re cycling and re purposing
A Vintage Journey _ Bountiful harvest
Inspiration Journal - Happy Holidays

Until my next creative journey...
Happy Crafting and Recycling.
Cheers.