Sunday, 26 February 2017

A round up with PLAID.

Hello crafty folks...
I have had the opportunity to play with PLAID products being in the design team of the leading craft store in India, Crafters Corner.
I have a round up of all my works there...Do take the time to peep in there to see all of them!
Look forward to hearing from you there....
Here are some ...


Until my next creative journey,
Happy crafting and recycling.
Cheers
Rupa


Thursday, 16 February 2017

My Spice Garden!

Hello Crafty folks!

Welcome to my page to day...so happy to share with you my Guest Design post for STAMPS and STENCILS blog. Indeed a great honor for me to be featured there and their challenge for this month is Texture, Crackle and paint! Isn't it yummy!
I just love all of them and in addition to these added my bit of re cycling too.
Here is what I made for myself! Maybe you can guess what it is ...if not wait till the end!

Here is what I started off with...

The front label which says "Spice Garden"...any guesses what this box is all about???


Here is the lid with the hand made flower, paper tassel and a distressed heart die cut with a message so apt!

For more details on the making and to know what lies inside the box...hop over to Stamps and Stencils blog.
Thanks for stopping by and do stop a moment over to tell me how you liked this project.

Until my next creative journey,
Happy crafting and recycling.
Cheers.
Rupa

Monday, 13 February 2017

Vintage Valentine!

Good morning!
Welcome to my page today! It’s Valentines tomorrow! Its all about love and roses and there are quite a few challenges that pushed me to play along!
I have created a wallet mini using a piece of 12x12 card stock and few extra pieces for the flap.
The mats were done with 2 sheets of 12x12 pattern paper from Bob and Betty, Ornate Annie paper pack.
 Such a romantic feel to the pack with lovely vintage prints and roses too!
I also made a few pockets and some tags with messages that are heat embossed in gold.
The embellishment on the front flap is what I spent a long time on.
The red roses are hand made using tattered florals and a pile of mini vintage postcards from the focal point.
A metal charm seals the love letters.

I have also kept some mini envelopes made with coffee stained papers as journaling tags. 
There is scope to keep over a dozen pictures inside!
The post card is an Itsy Bitsy die and I have stamped it on coffee dyed card stock and have further aged it with DI walnut stain and also some color splats on it.
I think this mini would make a lovely gift for that “special someone”…what say???
I would to link up to the following challenges…
Emerald Creek Dares- Rock the red
Crafty Gals Corner- Shades of Red
Creative moments- Love is in the air
Little red wagon- Use red/ pink and black

Until my next creative journey,
Happy crafting and recycling.
Cheers,

Rupa


Wednesday, 8 February 2017

Say it with Flowers!

Hello crafty folks,
Welcome to my page! I am so excited to share with you some hand made flowers that I made with the lovely paper collection and groove tools from DRESS MY CRAFT.
 I am a DT with Crafters Corner and I happened to make these flowers with my favorite Tim Holtz Tattered florals die. I can never get tired of this die.
This is how I started with the die cuts and used Distress inks in different colors and tones to color the petals and have used these tools to shape the flowers, leaves and butterflies too! 

The butterflied too were stamped on this special paper and one on book page and then colored.
 I worked with the tool to shape the wings and they were all set to fly!
For a detailed post on how to use these tools please click the link HERE.
here is look at the flowers that got done.
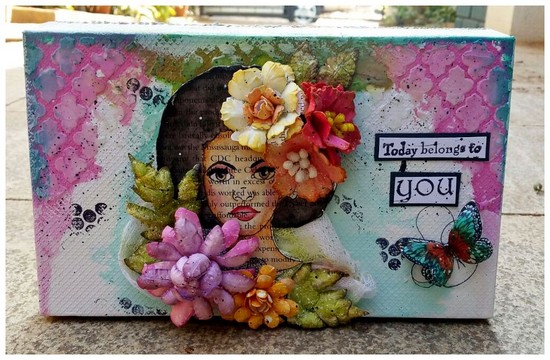
 Once the flowers were ready, I decided o use them in a project and I thought the prima Bloom girl was the perfect choice to show case these hand made beauties.
And so here I went about altering this packing box.....
I used a book page to stamp the image and have used Inketense blocks to color her. I loved how she looked and she was all set to adorned with these flowers.
I worked on creating some textures on the lid with stencils and texture paste and have tried the water color effect  so there I still have some negative space!
 I bit of random stamping for more textures and I had these stamped and inked butterflies hovering around this wonderful quote for the day!
This is how the bloom girl looks, all done up. 
Some color splats on the flowers give it little more mixed media feel and I like the entire shabby chic, CAS kind of look, lol!
I have not done too many whites at all!
I had a great time making these flowers and then using them up as embellishments ...hope to hear your comments on these too.
I would like to take this along to the following challenges...
The Crafters Cafe Ch blog - re cycle(box and book page)
Craft Stamper- Stamping
Creative Artiste Ch blog- Ag mixed media
A Vintage Journey- Words that are special
Rubber Dance Blog- Use pink, grey , green

Thank you so much for stopping by.
Until my next creative journey,
Happy crafting and recycling.
Cheers.
Rupa


Wednesday, 1 February 2017

"DISCOVER"- Mixed media

Good morning!
Welcome to my page today! It’s the 2nd month of the year and a brand new challenge at Rhedd’s Creative Spirit. It’s always anything goes, altered art or mixed media and full freedom to play your style.
Well, I decided to come out of my comfort zone and try mixed media and colors that I normally don’t do! However recycling is something that I do without, and this time around I have used an empty liquor carton.
I played around a bit with it to make it a horizontal caddy and then covered it with some tissue for the first layer of texture. Then used the TCW stencil and home made texture paste on the corners.
Next came the layering of die cuts, found objects and unused embellishments from my stash.
Once I was happy with the arrangement, I gave the entire box a coat of white gesso.
Then came the magic of sprays. I have used some color arte and Lindy’s magical to create the color burst here but in subtle tomes. I wanted a washed coral kind of look. So have played with pinks, oranges and browns and some black highlights.
I am so sorry, I got carried away in the process and could not click the pictures of the making.
Here is how it looked after all the spraying and some dry brushing.
 I then had a die cut label with sizzix thinlits which I thought would inspire me everytime I look at this caddy. I really want to discover more here.
I have my little collection of sprays from various brands sitting in this caddy. This way I have them all in one go and don’t have to go searching! You have to see my craft space to see how organized I am, lol!
As they say “embrace imperfection” I say embrace the creative mess too” that comes with it!
I hope this inspires you to play along and I hope to see you playing this month and do drop by to see what the team has in store for you.

Until my next creative journey,
Happy crafting and recycling.
Cheers,
Rupa