Saturday, 26 September 2015

Ageing Gracefully !

Hello crafty friends..
Welcome today to my page. I have a REAL project to share today.
If you are thinking I am going to share some beauty tips, lol...No way!
As I told you in my previous post about being a member of the Deco Art Blogger Outreach program and receiving those dream goodies and actually using them on my old furniture’s at home...ITS A DREAM COME TRUE!
Yes, I finally laid my hands on my Kitchen buddy for 10 years which I thought should get a makeover.
This is how the old one looked...
And hers’ how she has aged gracefully, lol! Perfect isn’t it???
Just a few steps and you can get this look.
Step1- I removed all the hardware from the set and voila ready to give the first coat of paint. Yes, its that easy. No priming or sanding...just a clean surface and you are ready to go.
 I used different colors of Chalky finish paints for the trio. Before the first coat, I just rubbed some candle wax on the areas I wanted some distressing and then gave the first coat. Once dry, the second coat. For impatient soul like me, this actually dries VERY fast!
Step2- I love this..DISTRESSING! I had a blast working my Ideology sanding block and scraping paints off from areas. You can actually get carried away here...as to how much you want to distress.
 But I told you I love it...so some extra scrubbing to reveal the wood beneath and this is so easy bcos of the wax.
Step3- A coat of the clear wax. I gave a generous coat of the clear creamy wax and yes, waited patiently for it to dry. No risk here. Once dry I dint think twice to coat it with the dark wax. 
I love weathered and aged stuff and its just magic how instantly on applying this it just changes color! But, you need to apply and wipe off the dark wax before it dries. It’s amazing how it just settles down in the grains of the wood and lends that beauty to the ageing process!

Step4- I was not keeping them plain. I decided to do some decoupage on this with some vintage flower napkins. I tore out portions of flowers and adhered them with the matt gel medium and one dry have a generous coat of the ultra matt varnish too. For the tray, I did some stamping of butterflies and script..its a habit now, lol!
 But I liked the final look! Time to fix the hardware’s back.
That’s how EASY it is!
What was 10 years old has aged beyond so gracefully and beautifully! I hope I made the trio happy. But, I am happy how it looks in my kitchen now. PERFECT...all set to be noticed and complimented.
I already have my eyes and hands set on the next piece of furniture !
Waiting for your comments too.
Deco arts products used..
Americana Decor Chalky Finish- Timeless, Vintage, refreshing, lace (love the names)
Americana decor cream wax- clear and dark brown
Deco Art media matt medium
Americana Decor Ultra matte varnish
Have a great day.
Until my next creative journey,
Happy Crafting and recycling.

Cheers.

Tuesday, 22 September 2015

One for the table!

Hello crafty friends..
I have a crafty share and some good news too! As always I have an altered art project to show you and the good news is that I am a member of Deco Art Blogger Outreach Program! Yeah...I was more than happy to receive a bunch of dream goodies, mostly paints, varnishes, wax and so on for furniture distressing!
Do you know what that means...my fav old furniture’s will be getting a makeover soon...not going to spare them too, lol!
Here is what I created with a few of the new products that Igot from Deco Art. 
An antique wooden caddy...you think so??? Wait till the end for a surprise reveal!
Here is how I went about making it...
Step1- I painted the box with black gesso and went about creating textures with stencils, stamps and home made texture paste. I used some die cuts from my stash too. 
I have adhered a cute angel made with POP and resin mold and have worked texture around it too. The focal point on both sides is the heart shaped frame which too has a textured border. The rope running all along the base of the box is made with air dry clay.
Step2- Once the texture was ready, I painted the whole box with black acrylic paint and then started working some brushed pewter DS on it, followed by a wash of burnt umber fluid acrylics. 
To further antique the look, I gave the entire box a wash of antiquing cream in patina green and then rubbed with a baby wipe. Lastly I rubbed in old gold, Inka Gold too. My antique caddy was looking a museum piece now! As if that was not enough, I rubbed in rusty hinge DI in places to give a worn rusty look!
Step3- I cut out this lovely angel from a decoupage tissue and adhered it to linen white CS, and cut it to size to fit the heart frame. I aged her too with some distress inking and Inka gold.I have applied Liquid glass clear on heart and on the other I used Triple Thick diamond glaze! The little angle is secure now!
Step4- I decided to give a pop of color to the antique caddy by embellishing it in fall colors. I punched holes on both sides, used gold eyelets and strung a copper wire for handle. 
All the glass beads and baubles are from my stash and I have used some patina green, orange, copper and black colors which brightens the caddy! A little metal charm that says it all hangs from the handle!
Step5- On one side of the heart I have orange twisted rose buds and a rusty metal wing that hangs above the angel.
 
On the other side some pretty white flowers and have colored the flowers on the angel’s hair!
Finally, a coat of Ultra matte varnish and my caddy was ready. Here is how it looks on my table with a little natural freshness picked from the garden! 
I have kept a few of the supplies that I reach out too quite often, so that I get to see this beauty.
Did I tell you that I altered a wooden caddy??? How could I if I dint have one...
No sweats..but I have THIS!
Thank you so much for stopping by today. I love to hear from you.
Deco arts Products used
Burnt Umber Fluid acrylics
Antiquing Cream patina green
Liquid Glass Clear
Triple thick Diamond glaze
Ultra matte Varnish
I would like to have this caddy enter the following challenges...
Frilly and Funkie- Stamps be gone
TIOT- add some metal
Brown Sugar Challenge- Anything But A card
Crafting musketeers- Autumnal colors
Stamps and Stencils- Up, Up, away in autumnal colors
OLLCB- feminine
Loves to Create Ch Blog- Ag mixed media

Until my next creative journey,
Happy Crafting and Re cycling.
Cheers.


Thursday, 17 September 2015

Cuppa LOVE

Hello crafty friends..
A quick post to share with you today! I was experimenting to alter an empty liquor carton, I cut it right in the center to get 2 pieces and this is what I did it to it.
A tea bag dispenser! I have a detailed tutorial here where I did a shabby chic style. For the other one, I decided to make it Vintage and used my new Graphic 45 French Country Stack papers! I love the country style patterns in lovely fall colors and it has a vintage feel to it.
Since I was doing 2 dispensers from one empty carton, I decided to keep this one simple. The papers speak for themselves! I inked them all with Walnut stain DI.
I chose 2 coordinating papers from the stack to cover the outside and for the inside used a green PP from DCWV.

The base and the lid was made using heavy chipboard and adhered some bottle caps here as feet. I have colored them with red acrylic colors and inked the edges with Archival black ink.
Around the base is a lovely grass hedge. I have used IO dies for this. This gives a closed garden feel!
I have embellished the lid again in fall colors. I decided to pick the sun flowers from the PP and made them using CLD sunflower die. The l;eaves are using CLD tropical leaves set.
I have used mustard seed, wild honey and walnut stain to color them. There is something about these flowers, it always brightens up any project!
Firstly I layered a bed of coconut coir, placed the sun flowers. Then I stamped this lovely tea cups on text papers. I have highlighted the flowers and added a small bling too. I have given an acetate backing to the cups so that they can be propped up! It looks as if the cups are in conversation!
 These are Hot Off The Press stamps, the sentiment too!
As you turn the box around, I have clipped an Ideology paper clip using a brad. Some paper scraps with inked edges hang on the back side for those eureka moments after sipping your favorite cuppa!
I would like to enter this is the following challenges...
Cherry Lynn Designs- Things with wings
Crafty Creations- Takes two ( 2 sun flowers, 2 cups, 2 bling and 2 pairs of bottle cap feet!)
Dream Valley Designs- autumn colors
Little Red wagon- Try something new( new paper pack, new stamps)
Our Creative Corner- shades of autumn
Rubber dance Art Stamps- celebration( have used the Nov’14 colors)
Scrapping 4 Fun – Branded scrapping paper ( Graphic 45 and DCWV)
Thank you so much for stopping by.
Until my next creative Journey,
Happy Crafting and recycling.
Cheers.


Wednesday, 16 September 2015

House of TEA

Hello Crafty peeps..
Welcome to my page today. I have reason to celebrate…I just a massive kitchen makeover and decided to alter things around there and even make some vintage décor pieces. This time I wanted something functional and of course wanted to recycle some household trash.
My kitchen is in vintage tones and I wanted the décor piece to compliment it. I wanted something catchy when I enter the kitchen and kept thinking what is that one thing that I cannot do without in my kitchen…the answer..TEA!
I LOVE my morning cuppa and thought I will give my old tea container a replacement! This time I decided to make a “tea bad dispenser” out of trash! I would be thing this first thing in the morning and wanted it to be bright and refreshing and yes, in my vintage theme!
I re cycled a liquor carton to make this! You heard me right…by doing this, I avoided the steps of measuring, folding and cutting! I cut the packaging right in the center and I got myself 2 ready dispensers that just had to fine tuned!
Here are the steps…
Step1- Once the bos was cut in half, I cut a small window at the bottom to dish out the tea bags and that it…The dispenser was ready in a jiffy. But the crafter in me was not giving into such a simple thing…I was going to build in textures and of course embellish it and make it a “arty affair”.
I modge podged some tissue paper all over the box and created some creases, then gave a coat of vintage white acrylic color. Once dry I applied rock candy distress crackle paint and then sprayed in Tsulineko Eucalyptus antiquing solution!
 The lovely vintage green just seeped into the cracks and just look at the amazing texture here.
Step2- My recent love for decoupage napkins has made me hoard quite a few of them and rumbling thru my stash, I found this lovely vintage piece . 
I kept the bird as the focal pint and worked the tissue around the box and modge podged it again. I just love how the tissue takes the texture and the cracks from beneath.
Step3- More textures with stamping. I took out my Archival inks in green and corn flower blue and stamped in the bg with Bo bunny script and Finnabair bubble texture. All of this was blending beautifully with the printed tissue. For the inside I have used soft pink PP from Recollections French Country Stack.
Step4- I cut out the base and the lid with chipboard and covered it with corrugated cardboard. I liked the rippled look which gives the look of a tinned roof! Dry brushed some gesso on the CC and gave my dispenser some feet using garden twigs! Trust me, it stands pretty well and lends that outdoor garden look.
Step5- I wanted to bring in more of the outdoors and so embellished the lid with a bed of coconut coir. Then came a layer of garden twigs. The tiny white flowers are made with modge mold and plaster of Paris. The pink flowers are using the TH tattered florals die, my fav die for flower making. Its amazing how this die can be altered to make umpteen types of flowers!
Step6- I added a little resin nest with eggs and the sentiment is from Marianne designs. I made a small hanging of it from the twig. The leaves are Sizzix die cuts. I also punched a hole in one corner and decided to hang a “jug of tea”!
Step7- Right behind, I was not happy to see it deserted and decided to hang the ideology paper clip with a brad and have some bits of paper hang in there. Always comes in handy when an idea of thought spars after that cuppa!
I am so happy to see this sitting on my kitchen counter now and am now looking for reasons to make tea! How about a cuppa with me???
So that’s it folks…my little “home” for my tea bags and a home for the little bird with lots of found elements from my garden! I think its its pretty warm and cozy here.
I would like to enter this in the following challenges…
Fan ‘n”Funky _ re cycle/upcycle ( liquor carton, corrugated cardboard from packaging, tissue paper from packaging, coconut coir, garden twigs)
Fan-tasticTuesday-AG, make it bright and beautiful
A VintageJourney- Home sweet home ( a home for my tea bags and a home for the little bird)
As you LikeIt ch- favorite die and why ( TH tattered florals die)
Crafting ByDesigns- Celebrate ( my new kitchen)
ElecticEllapu- pink team AG
Until my next Creative Journey,
Happy Crafting and re cycling
Cheers.


Friday, 11 September 2015

LIVE IN THE MOMENT

Hello Crafty peeps…
A warm welcome to all of you. I see some new followers whom I would like to thank and happy to be sharing a post after a break. Hope to keep the interest alive…
My tryst with empty packaging boxes is never ending and I am always exploring how they can be altered! It has reached such a point that I love to alter them and give as gifts too…of course not the empty ones! Today I share one such project where I have up cycled a Swarovski packaging box…you heard it right.
A box I don’t use any more cos the ring that was inside is in my finger now! I loved the box so much that I thought I will give it a face lift and gift something priceless to a dear friend.
I know this friend through blogging and we have been interacting for the past year and active on social media too. She has always been supportive and encouraging my re cycled crafting and is an amazing card maker herself. She recently came to India and though we could not meet, my gift reached her on time.
I wanted to try a new technique, something like a faux tile but without being glossy. This is a 3X3 inch box and perfect for experimentation…here we go with the process.
Step1-I cut out a 3x3 water color paper in white, divided it into 3 inch squares and created a little scenic background with DI. I blended in broken china on top . For the bottom, I blended in mustard seed and then moved on to peeled paint. I kept the center white. Next I flicked in some water droplets. Its crazy feeling to watch the little droplets react with the ink and lovely after effects!
Step2- I was waiting to use my new stamp set from Inkadinkado. I stamped in the lovely sunflower at an angle in the center and the little butterfly and dragon fly too. Next was to create more textures with stamping, and so I stamped some music notes here and there, some faux stitching and script stamping too. I also randomly applied some black embossing powder and heat set it for some fine texture!
Step3- With a water brush and DI, I colored the sunflower and the winged creatures and applied some micro beads as the flower center. The picture was slowly coming alive! As I was engrossed in the making there was just one thing that coming to mind, and I used thet as my focal sentiment. “LIVE IN THE MOMENT”….yes, very often we forget that!
Step4- The experiment begins now! With a heavy heart and not knowing how this is going to turn out, I cut the 3X3 piece into 1 inch cubes! I layered them on chipboard pieces (here again I used empty cereal box…I love them empty, lol)!
Then I inked the edges of all the cubes with archival black ink. It was little painful to see the picture cut to pieces, but once I layered tem back on the lid….. I breathed again! I looked better than before! I inked the edges on the lid with peeled paint and  stamped some little one liners all around.
Experiment success! It fit the lid perfectly and what a transformation to the Swarovski cox!
Is that it…do you think I would give her an empty box. No way, maybe not a “girls best friend” but something better!
And the box opens…..
Step5- I made some handmade jeweler with air drying clay and modge mold! I made butterflies in both sizes, waited for it to dry and painted them with metallic blue acrylic colors and then rubbed in Inka gold with my fingers to highlight the raised areas.
The trio of butterflies complimented the lovely scene on the lid and I tried to keep the same colors scheme here too. So some beads and jewellery findings and a black chord and this lovely neck and ear piece was ready! I even did a test run of this…wore it for an evening out to see how it takes to “real world”…success again! My friend, I hope you understand why I did this!
Step6- I did a mini tag with a flap in water color paper to hold this jewllery. Same colors blended with DI and water flicking and this time I stamped some Magenta and Hot off the Pres stamps. I made holes to hang the tiny butterflies and tied the neck piece around the tag.
Perfect…if not an original, it had to match the standards of the original content, lol! So I lovingly wrapped a silver net to hold all of this in place and a tiny handmade treasure was ready to leave.
Well that’s the story of a Swarovski box that went thru some cosmetic changes!
Do let me know if you liked my experiment. I had a blast making this, and more so the joy of giving this to my dear friend, Sathya.
I would like to enter my little treasure in the following challenges…
–The bright colors especially the blue was an inspiration!
Die CuttingDivas- 3D projects
Kraft Zone- altered art with sentiment
CraftySentiments- Box Challenge
CraftStamper magazine – Take a stamp
Make MyMonday Challenge – something with F (faux tile, flowers, feet...the box has flat pebble feet too!)
Try It OnTuesday Challenge- Try something new (faux tile and handmade jewellery)
Thank you so much for stopping by.
Until my next creative journey,
Happy crafting and re cycling.
Cheers and remember to “LIVE IN THE MOMENT”.


Tuesday, 1 September 2015

A hidden message..

Hello Crafty peeps…
Welcome to my page today. It’s the beginning of another month and I share with you my DT project for Rhedd’s Creative Spirit where the theme is always “Anything Goes” only altered art or mixed media, No cards please.
 I have an altered masculine box..actually a keep sake box for a man! This was a request from a friend to make something for her husband on their wedding anniversary. There is a hidden message with the box…well, it meant that all things needed to be kept in THIS  box and not all around the house, lol!
 I have made vintage  box and used the alphabet paper from TH lost and found paper pack. It had a lot of character and I decided to choose a contrasting color to go with it.
As always there is a surprise at the end. Keep watching!
Step1- I adhered the PP to the base of the box and chose apple green as the color to go with this. I ran a piece of black CS thru the dots embossing folder from Itsy Bitsy. I applied the green color to the textured CS,waited for some time and then rubbed off with a baby wipe and also sanded a bit to reveal the black color. I wanted the peeled paint kind of look and so this was an experiment on textured CS.
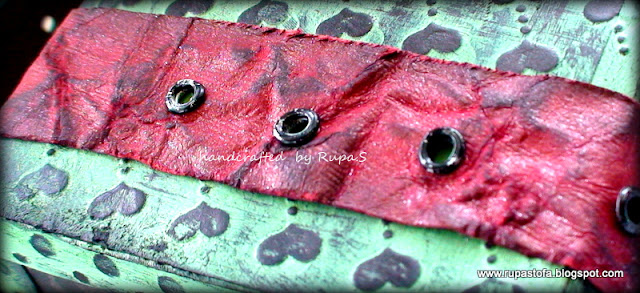
Step2- This green metal looking paper formed the hinges of the box corner and for the lid I used hearts embossing folder.  Before sealing the lid, I decided to bring in more grunge and texture and hence went with  faux leather. 
I misted a red hand made paper with glycerin and water and crushed it to break the fibers, repeated this a couple of time till it felt and looked like leather and ran some archival black ink on the raised areas. Voila, the faux leather was ready.
Step3- I made faux leather straps with black eyelets as the embellishment for the lid and also stamped in a vintage car from TH visual artistry set. 
Heat embossed the image and had it as the focal pint. Men and machine, I thought was a lovely combination…
Step4- resin hearts painted red and then a thick coat of black soot crackle paint reveled the red cracks. I used this textured heart as the closure embellishment beneath which is the Velcro dot which helps close the box snuggly. The sentiment “laughter and Love” is from kaiserKraft.
Step 5- The inside of the box is lined with complimenting PP. I have stenciled a lovely rose in apple green to keep the romantic element here!

 Some bottle caps painted in deep red gives character and sturdiness to the box!
That’s it…a lovely altered box for the man…the lady decided to keep a nice gift for him inside and I am told he LOVED the box more! 
Well, whether he got a hint of the hidden message, I don’t know but it is satisfying when you get a little complimentary words for your work from men!
 I made the inside a little more interesting with these little pull outs!
Ok…so how about the surprise…it was not easy to alter this box cos it is NOT a box actually! I mean it is not a regular box off the shelf…any guesses???
Most of us have it with us and many of us can’t do without this gadget though in all probabilities the box may not be with you!
Wait…here it is….
I played around with the construction of this packaging box and believe me, with all this treatment, it turned out to be one sturdy box!
Hope this prompts you to play along and do have a look at the wonderful works of my teamies here.
I would like to have this box enter the following challenges…
Altered Eclectics- AG
That Craft Place - AG mixed media
We Love To Create Craft- Anything creative/mixed media
All Sorts Ch Blog- Re cycle/Up cycle
Brown Sugar Ch Blog- make the sentiment BIG
That's Crafty ch Blog- Alphabet soup (have used alphabets PP)
Rubber Dance Ch blog- Celebration ( have used Feb 2015 color scheme)
Simon Monday Challenge- trio of colors(have used apple green, black and red acrylic colors)
Until my next creative journey,
Happy Crafting and re cycling.

Cheers.